


Written by StreamYard
How to Embed YouTube Live Chat on Your Website
Do you already have an existing website or a blog where you have regular visitors? Taking advantage of this to increase your live stream engagement is something you'll want to do. In this blog, you will learn how to embed Live Chat on your website.
But, before we get there, let's understand why embed live chat anyway.
Why embed live stream video and live chat on your website/blog?
- People already visit your website, which increases the chances to build your audience during the live broadcast.
- Share additional content from your website or blog during the live show.
- Turn your website into a one-stop destination for your live shows, archived broadcast, articles, and podcasts.
We will first discuss building the live stream embed code and then embedding the code on your website or blog. So, let's get started.
Building The Live Stream Embed Code
Step 1: Be sure you've scheduled your live stream broadcast. It is important to note that your live stream should either be public or unlisted in order to embed live chat. Use an unlisted live stream to test this feature.
Step 2: Visit the scheduled live stream video on YouTube and click on share to copy the video ID.

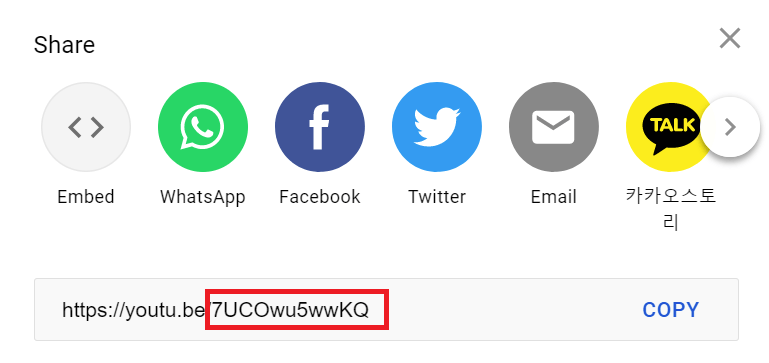
Here the video ID is: 7UCOwu5wwKQ
Step 3: Get your domain name. For instance, if you would like to embed live chat on xyz.com, then "xyz.com" is your domain name.
Step 4: Take the video ID from step 2 and domain name from step 3 and replace in the following code:
<iframe width="350px" height="500px" src="https://www.youtube.com/live_chat?v=yourvideoid&embed_domain=yourdomainnamegoeshere.com" ></iframe>
In our example, the final code would look like this:
<iframe width="350px" height="500px" src="https://www.youtube.com/live_chat?v=7UCOwu5wwKQ&embed_domain=stephensimon.xyz" ></iframe>
Now that you have the embed code, it’s time to add it to your website.
Embed Code On Your Website Or Blog
Broadly, there may be two scenarios. Either you have a WordPress website, or you have written code for it. Let's cover both situations.
Embed live chat on WordPress website/blog
On your blog post or a page on WordPress, add a new HTML code block. Save as draft or publish to video the live chat on that page.

Paste the embed code you made in step 4.

Click on Preview, and you should now see the following output.

I also embedded the live video next to it, and the output looks fantastic.

You may change width and height values in the embed code as per your needs.
Embed live chat on an HTML Page (code)
For simplicity, lets suppose you have an index.html page on website and you would like to embed live chat there. Add the embed code you made in step 4 in the body section.
<!DOCTYPE html>
<html lang="en">
<head>
<meta charset="UTF-8">
<meta http-equiv="X-UA-Compatible" content="IE=edge">
<meta name="viewport" content="width=device-width, initial-scale=1.0">
<title>Document</title>
</head>
<body>
<iframe width="350px" height="500px" src="https://www.youtube.com/live\_chat?v=7UCOwu5wwKQ&embed\_domain=stephensimon.xyz" ></iframe>
</body>
</html>
Here's how the final output looks:

Conclusion
Streaming to your website or blog with a live chat embed can increase your audience engagement exponentially. The process is not very straightforward but is worth it. And, it works like a charm. Also, you are not relying on any third-party resource, and it is absolutely free.
We hope that this post has helped you learn how to embed live chat on your website.
Happy embedding!
