

Written by StreamYard
How To Go Live On Instagram On PC (Video Tutorial Included)
Going live on Instagram can be a fun and engaging experience. For one, it can help you create a more personal connection with your audience... in real time! For example, they can ask questions and socialize with other members of the audience. But that’s not all. Did you know that the platform actually prioritizes live sessions?
So, if you're looking for a more direct and authentic way to interact with your followers, Instagram Live might be the perfect fit for you. And the best part? It’s super easy to go live. Below, you’ll find all the steps (with images) so you can make the jump and engage more than two billion monthly active users!
Alternatively, if you just want a quick video tutorial, check out the video below.
First Things First: What’s Instagram Live?
Imagine you're hanging out with your friends. Or you're cooking your favorite meal... and suddenly, you decide to pull out your phone and start a live video. That's Instagram Live! The feature basically allows you to broadcast yourself in real-time, while people can also jump in, leave comments, and ask questions. And once you’re done, poof! The video disappears.
Many Instagram live streams are produced using the phone, but there’s no reason why you can’t also rely on your PC to give your audience a sneak peek behind the scenes, have a spontaneous chat, or simply share a moment as it happens. Some common options include OBS (which uses a popular RTMP protocol), but if you want to stream to multiple platforms, we have a better option!
The Benefits of Going Live on Instagram
The main advantage of using Instagram is that you have instant access to more than 500 million users who log in each day. In fact, among the most popular social networks, Instagram is ranked 4th. That’s about 2 billion monthly users, just a little below Facebook (3.03 billion), YouTube (2.49 billion), and WhatsApp (2 billion).
All of this is to say that Instagram has a massive user base. So, access to this audience is definitely a pro. But what about the ability to go live? Well, in the realm of social media, sharing your content in real-time also has many benefits. For instance:
- You can connect with your audience more easily. For example, if someone tunes into your stream, you will know it and will be able to interact with them using the chat. What’s more, people can even join you using their camera and mic if you need them to.
- You can remind your followers you are right there, live. Because when you do it, the platform will send a notification to them. Plus, your live video will instantly skip the line and appear on their home page. So, you get more exposure and will be able to grow your channel more easily!
- You can use live streams to help build your community. After all, what better way to show your followers you’re authentic than jumping into a casual video that prompts conversation and interaction? Live streams also give people the perfect opportunity to not just get to know you better but also talk to others who are interested in what you do.
Instagram Live For PC - Step-by-Step Instructions
As we have mentioned above, you don’t need much to go live on Instagram. If you’re using the Instagram app, the only requirement is to give it access to your camera and microphone (and have an account that is older than 30 days).
This is how most people go live: using their smartphone. But this doesn’t mean you can’t use your PC if this is the method you feel more comfortable with. We’ll show you exactly how to do this, but let’s first make sure you have all the required components!
Step 1: Plan Your Equipment and Setup
To plan for an Instagram Live session via PC, you'll need to consider two things: equipment and a setup.
As you might have guessed, a camera and a microphone are a must. So, the first step when you’re planning to go live is to ensure that they are both set up and functioning properly. You can check this through your operating system or do some local recordings to see how things sound.
The environment is also important. You will want to make sure the space from which you’re live streaming is not too noisy and that you won’t suffer interruptions. It’s also a good idea to think about a visually appealing location. If you live with others, it can be a good idea to let them know you’ll be going live and for how long.
Check that your internet connection is stable and capable of supporting a live stream, too. You can do this by loading a few sites on your browser. Before the actual live session, you can do a practice session to iron out any issues.
Step 2: Make Sure You Have a Professional Instagram Account
Live streaming to Instagram is enabled on all Instagram professional accounts. If you don’t already have one, it’s really easy to switch. Here are the instructions:
- Go to your profile (you can do this on a desktop, Windows, or Mac, or on the app) and then click on Edit profile.
- Scroll down and locate the Switch to professional profile on the left menu.
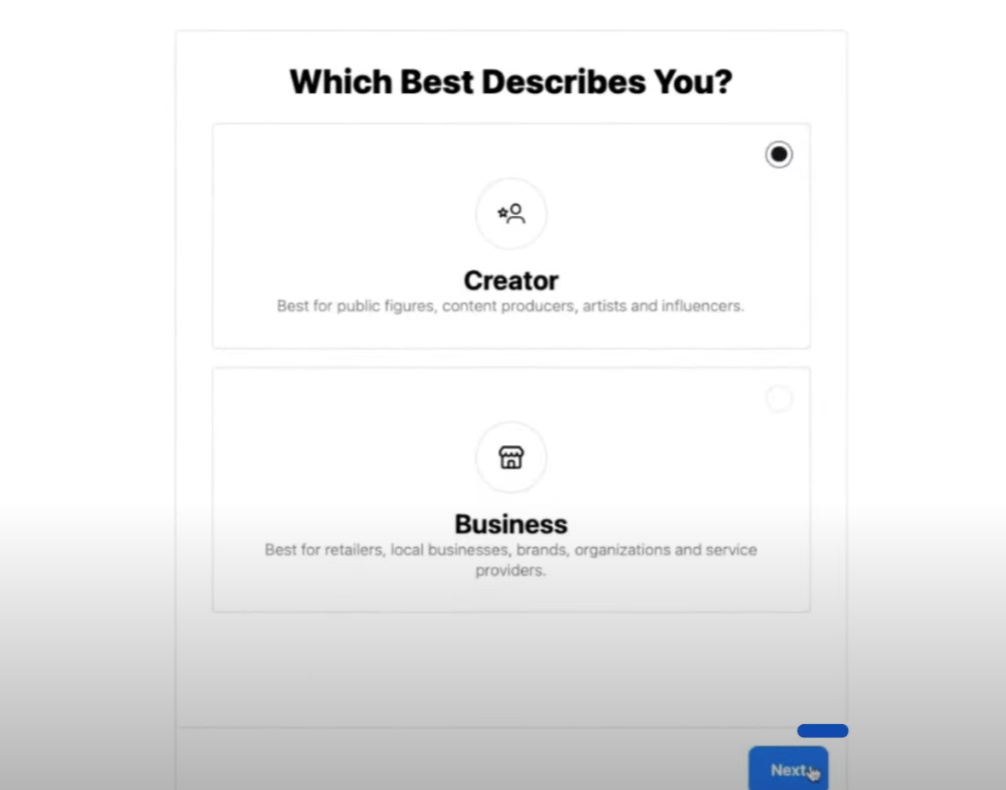
- Choose whether you are a Creator or a Business. Either will work for live streaming. When ready, click Next.
- Select a category that best describes what you do. For example, Personal Blog, Art, Health, Beauty, etc., and click Done.
And that’s it for this step! Now, you have a professional Instagram account and can stream live to your followers.
Step 3: Sign Up For Live Streaming Software
One of the easiest ways to stream live on Instagram is to use StreamYard. StreamYard is a professional live streaming and recording studio you can manage directly from your browser, so it makes things super-easy.
The first thing you will need to do to get ready is visit the the StreamYard sign-up page at streamyard.com/signup.
You can sign up using your Google account or continue with your email. If you choose to sign up with your email, you will need to enter your email address and follow the instructions to create your account. If you prefer to use your Google account, you can select the Sign up with Google option and follow the prompts to create your StreamYard account.
Step 4: Prepare Things On Instagram
We’ve covered the basics of planning, how to open a professional account, and how to set up StreamYard. So, it’s time to go live!
Let’s head to Instagram.com using your computer. Then:
- Locate and click on Create on your left sidebar. Then, choose Live video.
- A popup will open, asking you to add a title and choose an audience. There are three options: Public (everyone can see it), Practice (only you can see it), and Cancel. If you want to test it out, choose Practice. Otherwise, click on Public.
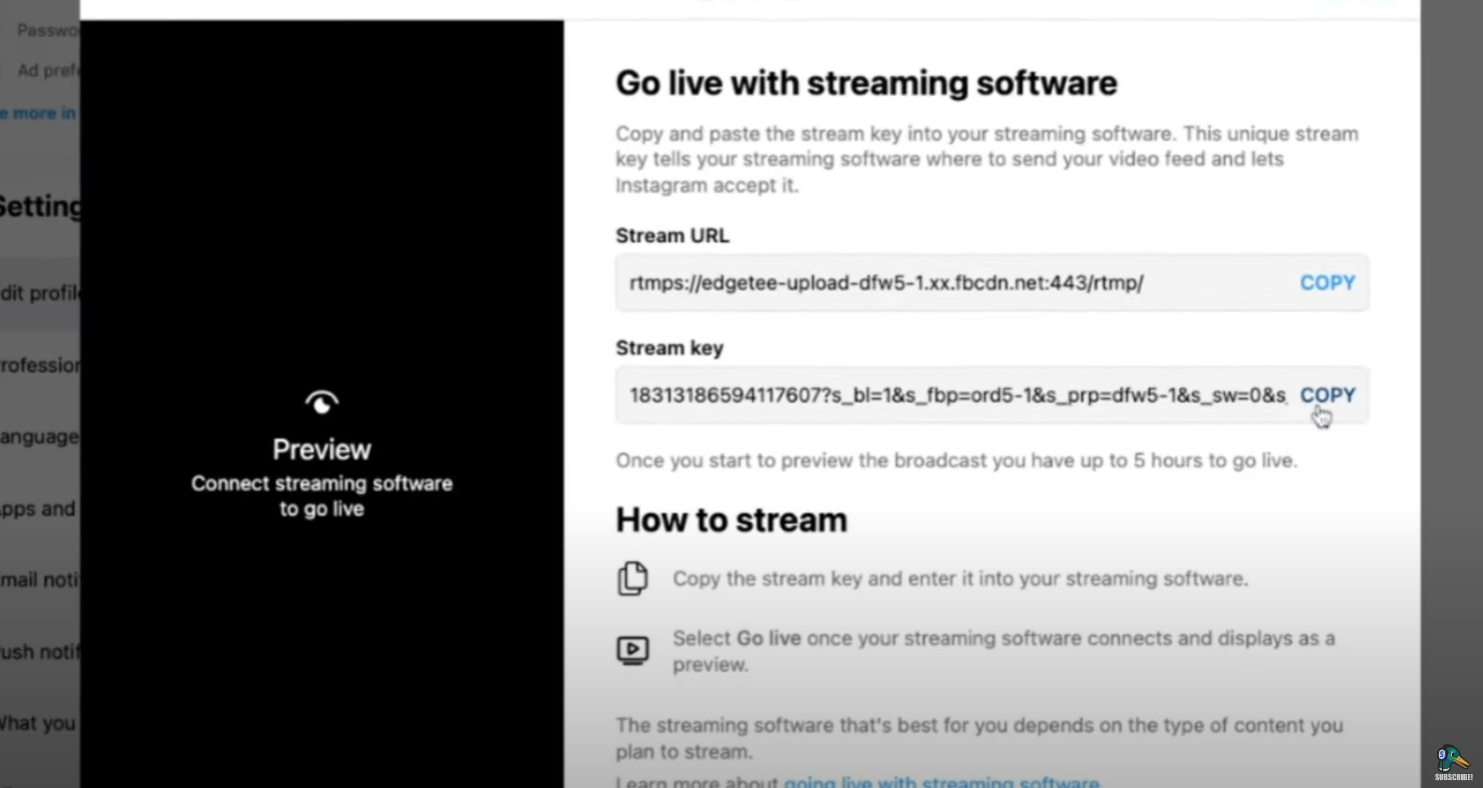
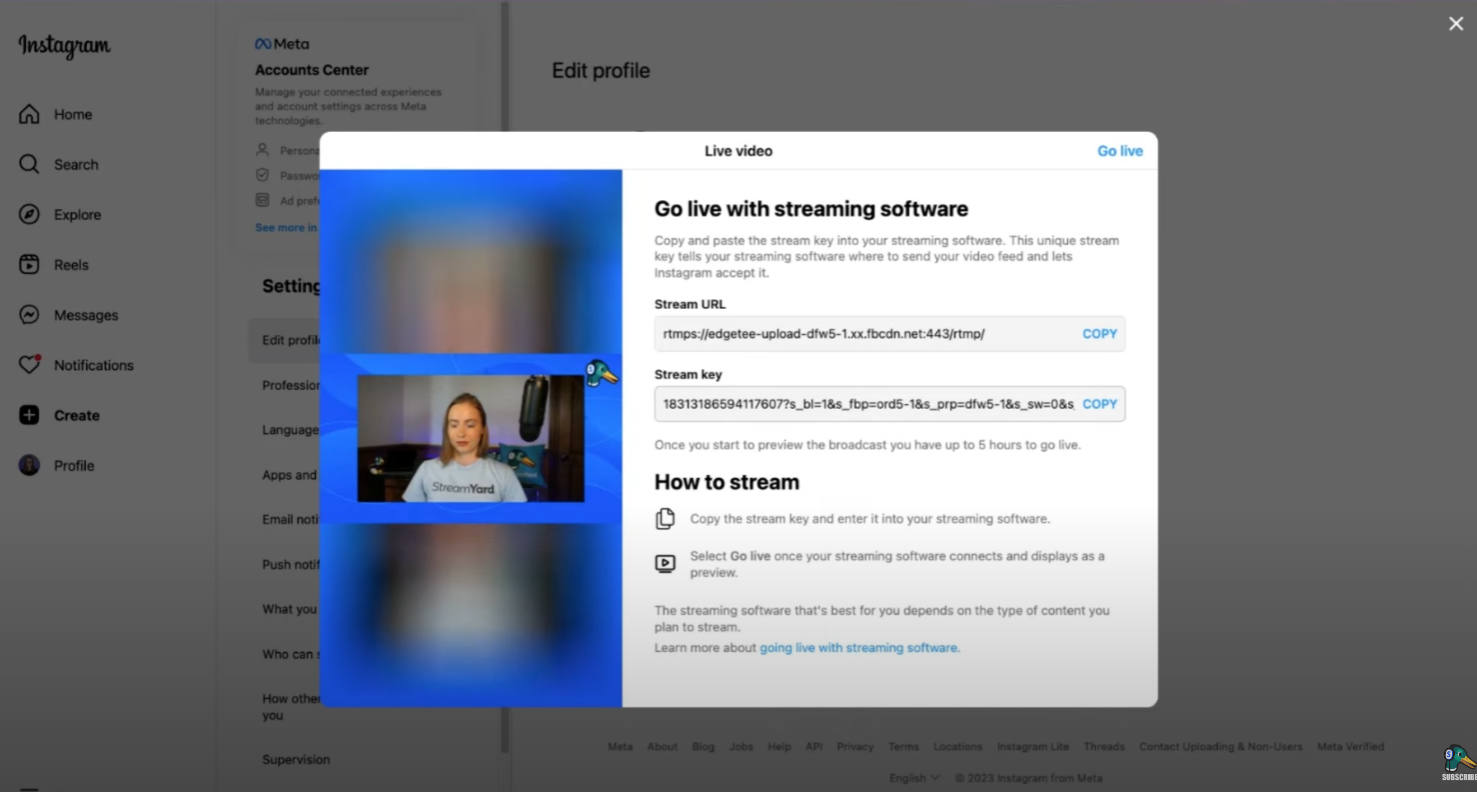
- Click Next. This will open another popup, this time showing a Stream URL and a Stream key. Copy this Stream key and head back to StreamYard.
Step 5: Live Stream To Your Instagram Followers!
Now, all we need to do is set up your stream in StreamYard.
- Head over to your dashboard and click on Create, under Streams and recordings.
- Then, click on Live stream.
- Click on Add a new destination and choose Instagram Live from the dropdown menu.
- Type your username in the Instagram username box. This is just required to organize your different streams, but it won’t be shared with anyone else. Then, click on Add Instagram Live.
- Make sure your destination is selected, and type in a Title. This is where StreamYard is a step ahead compared to other platforms! You can also multistream to other social media destinations by clicking on the button with the + symbol. However, for now, we’ll focus exclusively on Instagram.
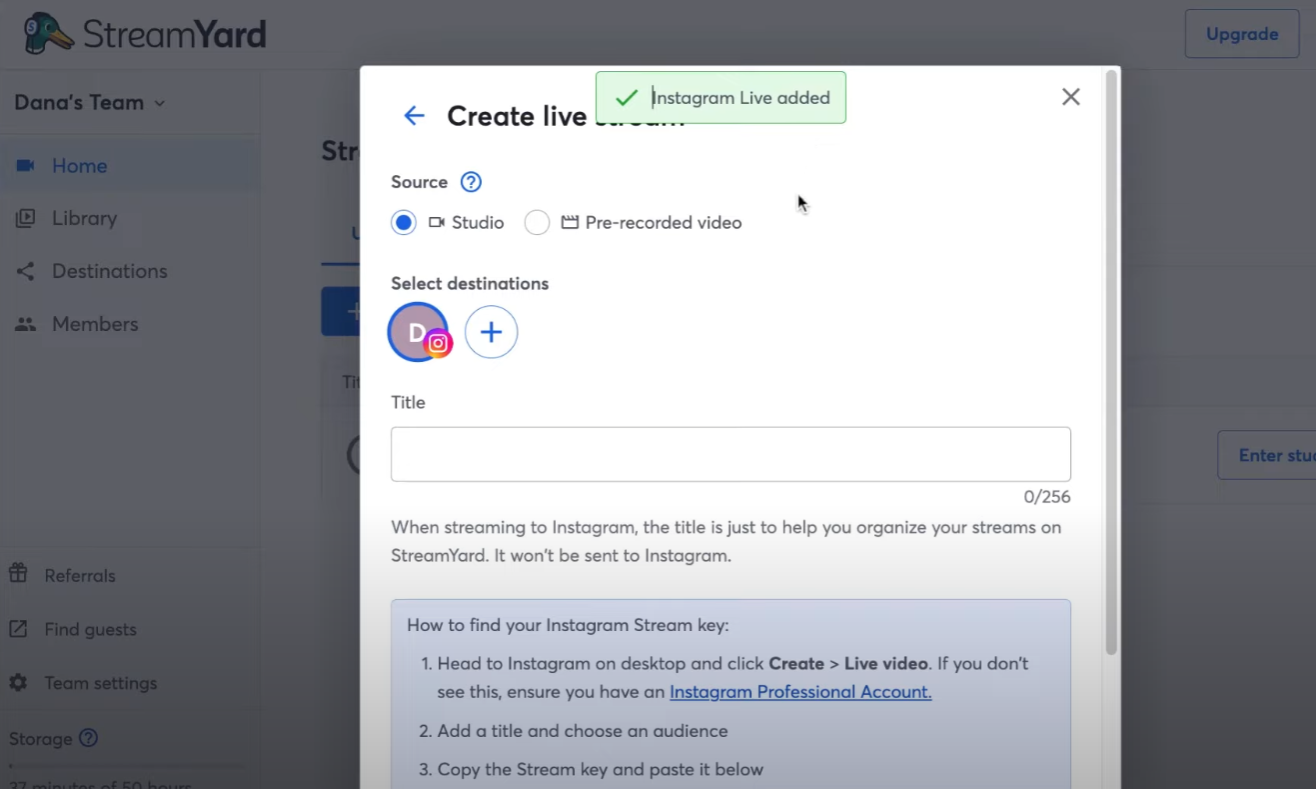
- Past your previously copied Instagram Stream key (the one we got from your Instagram settings in Step 4) and paste it into the box below Instagram Stream key.
- Click Create live stream.
This will take you to your studio, where you will be able to test your equipment one more time and make sure things look right. Take this opportunity to check your background, decide whether you want to add other screens or presentations, and when you’re ready... click on Go live!
There will be just one more set of options here: Your stream quality and whether you want to use local recordings, too.
Your streams will then start being sent to Instagram! But this is very important: Until you click on the Go live button in the top right corner, you won’t be broadcasting yet! So, go ahead and click it!
Once you’re live, you will be able to interact with your viewers using the Instagram chat. All StreamYard plans include this integration, so you won’t have any trouble finding it.
Step 6: Improve Your Live Streams Each Time!
Before we close this article, we want to reinforce the idea that (whenever possible) you should always adapt and improve your content. So, here are some extra little tips to get your live streaming to the next level:
- Invest in high-quality equipment: Use a good camera, microphone, and lighting to enhance the visual and audio quality of your stream.
- Optimize your live encoder settings: Adjust the settings of your live encoder to ensure the best possible output for your stream.
- Always use a professional online video platform: Choose a reliable online video platform to host and manage your live streams.
- Stable internet connection: Ensure a stable and fast internet connection, preferably through an Ethernet cable, to avoid disruptions during the stream.
- Add visual elements: Incorporate visual elements to make your stream more engaging, such as graphics, lower-thirds, and branding.
- Prioritize planning: Plan your live stream in advance, considering the content, equipment, and technical requirements to avoid last-minute issues.
- Improve audio quality: Pay attention to the audio quality by using a good microphone and minimizing background noise.
- Manage volume levels: Adjust the volume levels to ensure a balanced and pleasant listening experience for your audience.
Conclusion
Let’s quickly recap what you need to do.
Firstly, you must have an Instagram professional account. You will also need to copy and paste your Livestream key into StreamYard. And you will have to click Go Live on both StreamYard and Instagram (this is a little different in other platforms, so make sure you do both!).
By the way, StreamYard is the easiest way to live stream to multiple platforms at once – it doesn’t just integrate with Instagram Live!
So, are you ready to go live? Get started with StreamYard for free today.