


Written by StreamYard
7 Ways To Improve Live Stream Audio
Figuring out ways to improve live stream audio is a great way to enhance the quality of your live streams.
This isn't just a "feel good" thing, though.
Your live stream viewers might tolerate poor video quality but not poor audio. And, so, nothing really ruins your live stream as much as bad audio.
However, the good news is that it doesn't take too much (nor does it have to get expensive) to improve live stream audio.
In this guide, we share seven ways to improve live stream audio. Remember, you can implement these techniques for other popular audio use cases like podcasting, running webinars, online workshops, hybrid events, virtual meetings, etc.
So, apart from ensuring that the basic requirements such as recommended upload speeds are met, follow these steps to improve live stream audio:
7 Ways To Improve Live Stream Audio
Whether a muddy voice or background noise is hampering your live streaming experience, follow these tips to ensure good audio each time you go live:
1. Invest In The Right Microphone
Picking a good microphone is a sure shot way to improve your live stream's audio as a mic's quality directly impacts the sound it produces. Since sound or audio is the most important component of a live broadcast, make sure your choice reflects the sound you seek.
Choosing a microphone also depends on how you intend to use it, where you want to position it, and more. For example, do you want the microphone to be discreet and not in your live stream? Are you going to record musical instruments using the mic? Will you be moving around during your live video? While there are mics that are versatile and suitable for most of these scenarios, you must evaluate their features and capabilities before picking one.
Further, the characteristics of a high-quality microphone will depend on the type of microphone and the technical specs of the microphone you choose: directionality, frequency response, the quality of the transducer inside your microphone, and more.
While a headset mic is often the best choice for live streams, you can research and try different mics to find the right one based on your requirements. Additionally, a mic with tighter polar patterns — like super-cardioid or cardioid instead of omnidirectional — will pick up your voice more and fewer background noises.
2. Position The Microphone Appropriately
Focus on your mic's placement to deliver clearer, crisper audio for your live stream listeners. Consider mounting the mic according to your preferences, live streaming setup, and location (indoors, outdoors, or both). It will also ensure stability and help accommodate any other accessories you might have.
If you are live streaming indoors, you'd want to use a table-mounted stand for microphones. Or you could choose a mounting arm or even a boom arm for microphones.
Make sure that the mic is positioned at about 6-12 inches away from your mouth. Ideally, you should set it in front of your mouth. But if you experience "P-Pops" and other plosives, try experimenting with the position (move it slightly below, above, or to the side).
Remember, the closer the mic is to the speaker's mouth, the better the audio quality. Besides reducing unwanted noises like shuffling, typing, fiddling, etc., keeping the mic closer can also prevent voice distortion.
Pro Tip: Use a pop filter to avoid picking up plosives and mouth sounds and improve live stream audio.
Check out this video to learn more about better microphone audio in your live streams:
3. Choose A Good Location
The main appeal of live streams is their engagement. And to ensure that you engage your audience well, you need to choose a location that improves live stream audio.
If you're live streaming indoors, choose a room with favorable acoustics. Try and avoid rooms with high ceilings which can lead to hollow-sounding audio. You can always achieve better room acoustics by opting for a smaller room without much reverb. Then, cover hard surfaces with blankets to avoid the sound bouncing off the walls. If you want to take it up a notch, invest in acoustic panels or even soundproof your room.
On the other hand, streaming outdoors could be trickier. But you can overcome that as well, provided you have the right accessories like a windscreen for your mic, and you know how to reduce background noise. Read the next step to learn more about reducing background noise as you live stream.
4. Reduce Background Noise
Reducing background noises is essential for high-quality live streaming. It also keeps you sane, increases productivity, and reduces the "unexpected stress" that may creep in because of cars honking, dogs barking, or even children playing in the background.
And you may not know it, but background noises are equally stressful for your listeners.
Luckily for you, this StreamYard guide can help. So, go ahead and read it to limit noise offenders like the background hum from a computer fan and improve live stream audio.
In addition, you can use tools like Krisp and Utterly to eliminate background noise and minimize distractions while live streaming.
5. Run A Test Live Stream
Once you have followed all the above steps, run a practice live stream to see if everything is in place. No matter how much you have planned and prepared, you must test it to ensure everything runs smoothly and sounds great.
Testing your live stream will also give you the confidence to deliver a remarkable live streaming experience to your viewers and listeners.
Try listening with and without headphones and on different devices to analyze how your live stream looks and sounds on the TV, laptop, mobile device, etc. Then, if needed, make the necessary adjustments to improve your live stream audio before you go live. Feel free to ask your business partner as well to help you test your live stream audio.
To learn how to run a live stream without going live, watch this video:
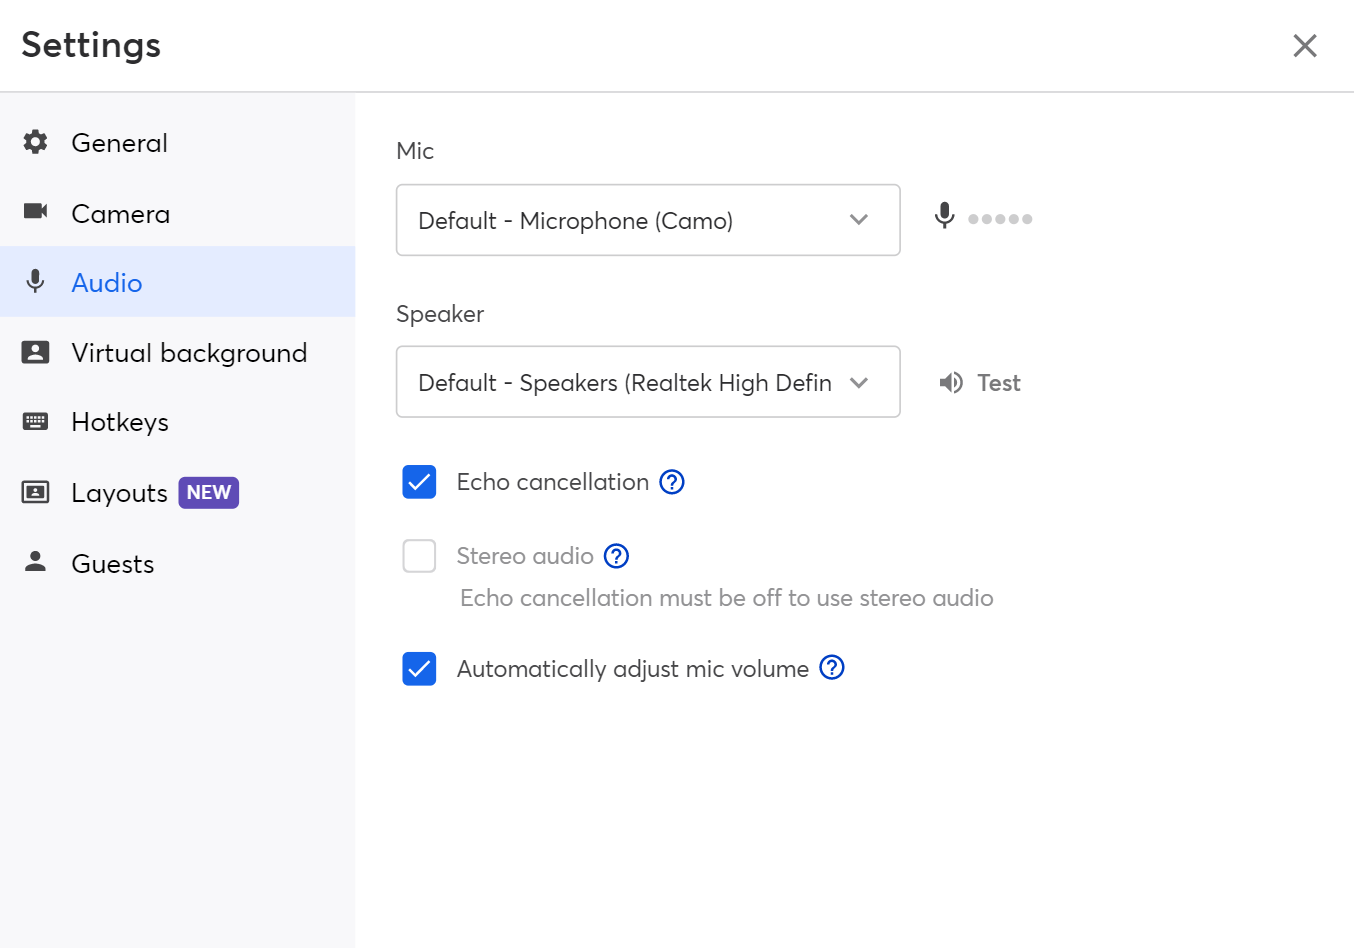
6. Enable Echo Cancellation To Improve Live Stream Audio
Another terrific way to increase live stream audio quality is to use StreamYard's echo cancellation feature in your settings. With functionalities like noise suppression and audio gain, this feature can help you improve the audio quality of your live stream.
Here's how to enable/disable echo cancellation in StreamYard:
- Go to your StreamYard Studio and click "Settings."
- Click the "Audio" tab and check the "Echo cancellation" box to enable the feature.
- To disable the feature, uncheck the "Echo cancellation" box.
7. Loosen Up & Be Yourself
Think about the people who are about to invest their time by tuning in to your live stream. Your content, inputs, and insights matter a lot to them. So, in your quest to make your live streams perfect, don't lose out on your live streaming charisma.
Relax and be yourself as you hit that "Go live" button. Imagine talking to your best friend or a close family member. Let your natural voice come through, speak normally (not too fast, not too slow), and articulate your words. Don't run on sentences to avoid nerve-induced rambling. Instead, take pauses wherever necessary and practice active listening to create concrete live broadcasts, while looking into the camera.
Ready To Improve Live Stream Audio?
Audio is a crucial component of any video, and live streams are no exception. Poor audio can make more live stream viewers/listeners tune out of your live broadcast than poor video.
So, be sure to spend time improving your live stream audio quality by following the abovementioned measures. Create crisp-and-clear sounding audios to exceed your live stream viewers' expectations.
And if you landed on this guide because you're a podcaster, here's another fantastic guide you must check out to build a community with your podcast.