Written by StreamYard
What is Clean HDMI? Why does it matter for my Live Stream?
In this post, we will discuss the importance of clean HDMI for live streams. You will also learn how to set up the feature on some of the best live streaming cameras out there.
The aim is to get you excited about the power of clean HDMI for delivering excellent, flawless live streams.
Let’s get started!
What is Clean HDMI?
Using HDMI to stream your feeds offers both video and audio transmission. When it comes to pushing out great live content and developing connections with your audiences, you want the cleanest video feed for your viewers.
Depending on the type of camera that you are using, several user interface (UI) elements like exposure setting, battery percentage, remaining recording time, recording signal, etc. can appear on the screen when you are streaming.
This is where clean HDMI helps.
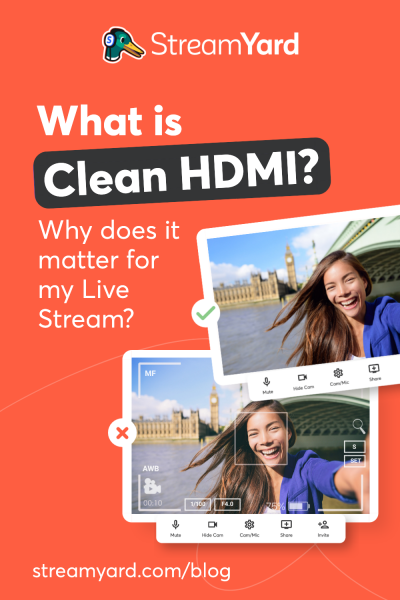
A clean HDMI output is an HDMI video that doesn’t have burn-in data taking over your screen. In simple words, the output is “clean”, without the UI elements appearing on your screen.
But why does clean HDMI matter for my live stream?
While having the right content is important for your live streams, you also want the live video to be high quality and aesthetically pleasing.
While live streaming allows you to be on various streaming platforms like YouTube, Twitter, Facebook, Twitch, and LinkedIn, not all of them accept data indicators to be displayed during the live stream.
So, live streaming with a camera that comes with a clean HDMI output becomes essential. Apart from making your content look clean, it also prevents viewers from getting distracted by the UI elements that can appear for some camera models. The more they can focus on your live content, the better your chances of keeping them hooked for longer.
Having a clean HDMI output can help your live stream look more professional, but how do you set it up, and what do you need to know? Let’s find out!
How to test if your video source has clean HDMI for live streams?
You can always test your video source before you start a live stream. Doing this will help you know if your output is clean or not.
Step 1: Connect your camera (video source) to a screen output like a TV using an HDMI cord.
Step 2: Monitor the results to find out if your HDMI is clean or not:
- If the output is clean, you will only see the image without any data indicators
- If you see data indicators, such as ISO, F-stop, and shutter speed along with your image, then either your camera does not have a clean output, or it is not configured
Usually, cameras that support clean HDMI output are set up by default, but you can also set it manually if it’s required. The process depends entirely on the type of camera you want to use. So, before investing in a live streaming camera, make sure that your preferred model has a clean HDMI output. Below, we share some examples of cameras that support clean HDMI.
Top cameras with clean HDMI for live streams
Many professional cameras support clean HDMI output at different resolutions and speeds.
Here are some of the top choices of cameras with a clean HDMI output and guide you on how to set the HDMI feature in a few easy steps:
Canon EOS M50 Mark II
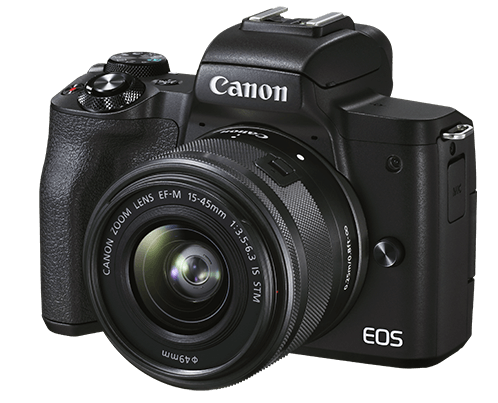
With a 24.1 Megapixel CMOS sensor, built-in Wi-Fi®, and use with EOS Webcam Utility software that makes it an easy webcam alternative, the EOS M50 Mark II from Canon is an excellent pick for live streamers looking for a camera with a clean HDMI output.
Setting Up the Clean HDMI Output feature:
- Press the “INFO” button on the camera.
- Click the “HDMI info disp”.
- Set to “Clean FHD output”.
Canon EOS M6 MK II
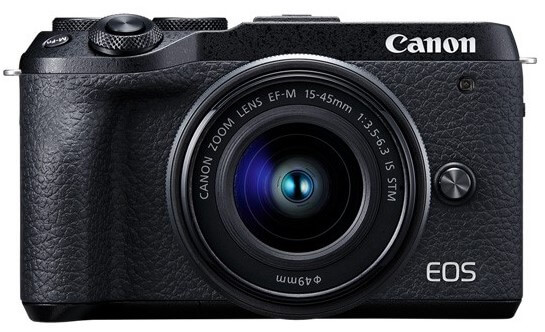
The compact, mirrorless EOS M6 Mark II camera is one of the best picks for a camera with a clean HDMI feature. With its 32.5 Megapixel CMOS (APS-C) sensor and DIGIC 8 image processor, it’s great for live streamers who seek uncropped 4K 30p videos to woo their audiences.
Setting Up the Clean HDMI Output feature:
- Go to Menu and click on the Camera Icon.
- Hit the “HDMI info disp” tab.
- Choose “Clean FHD output”.
Canon VIXIA HF G20
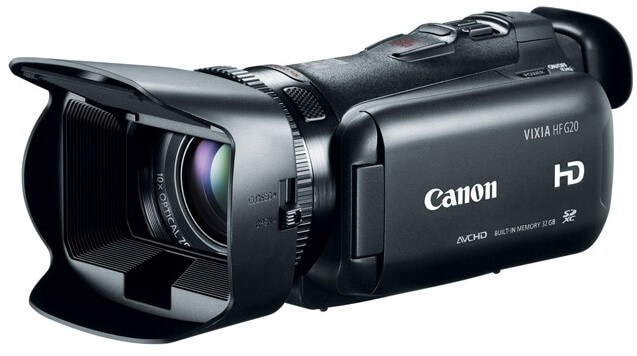
The VIXIA HF G20 from Canon is a pro-level camcorder equipped with a Genuine Canon 10x HD Video Lens with an 8-bladed iris for impressive video quality. In addition, it comes with a clean HDMI output and the Canon HD CMOS Pro Image Sensor, which offers excellent flexibility with extended dynamic range, improved gradation, and superb light capture even in low-light settings.
Setting Up the Clean HDMI Output feature:
- Click on Menu.
- Then, select “System Setup (the Wrench Icon)".
- Toggle to “Output Onscreen Displays” and set it “OFF”.
Panasonic AG-UX90
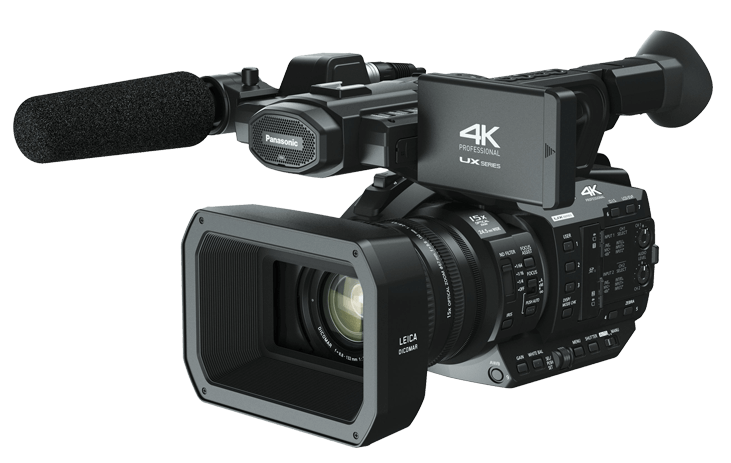
Another great camcorder featuring a clean HDMI output, the Panasonic AG-UX90 comes with a wide-angle 24.5 mm, a 15x optical zoom lens, and a 1.0-type MOS sensor to deliver high-quality 4K/FHD images and an unbeatable performance.
Setting Up the Clean HDMI Output feature:
- Press Menu.
- Then, click “Disp Setup”.
- Finally, go to “Video Out OSD” and set it “OFF”.
Panasonic LUMIX S1
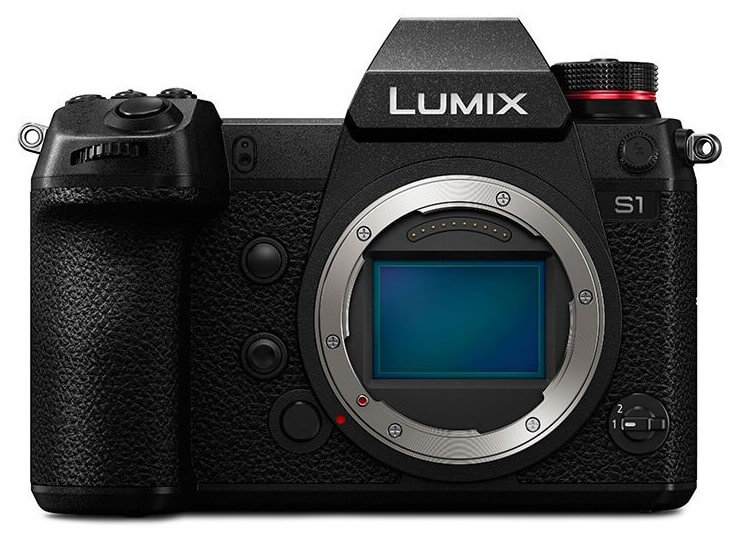
Here comes the LUMIX S1 from Panasonic with a 24.2MP CMOS sensor, powerful image stabilization, and 4K 60p video. Enabling the clean HDMI output feature on this one is fairly simple. Follow the steps mentioned below to get going!
Setting Up the Clean HDMI Output feature:
- Go to the Menu.
- Select the “Movie Camera” icon.
- Go to the “Back of Camera” icon.
- Select “HDMI Rec Output”.
- Hit the “Info Display” tab and turn it “OFF”.
Sony α5100
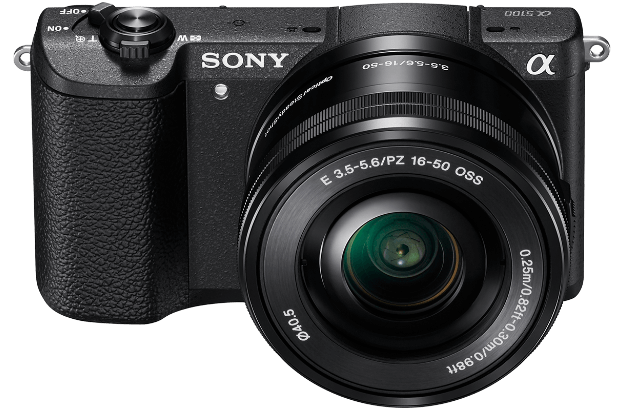
When picking the best clean HDMI cameras, the Sony α5100 makes the list. Besides boasting a 24.3 MP Exmor® APS-C CMOS sensor, it also comes with the revolutionary BIONZ X™ engine and 180 º tiltable LCD screen for those remarkable live streams.
Setting Up the Clean HDMI Output feature:
- Press the "Menu" button.
- Select “Setup”.
- Go to the “HDMI Settings”.
- Toggle to “HDMI Info. Display” and turn it “Off”.
What should I know about HDMI?
As a live streamer, you should be familiar with standard A/V technology. HDMI is a widely used standard that you should know about.
It offers simultaneous audio and video output through one cable, which is convenient and helps reduce the chance that your audio and video signal will get out of sync. However, there are a few additional things to note about the use of HDMI in live streams. One of them is the type of cord you are using.
The type of HDMI cable used in live streams determines the output quality. When live streaming, keep in mind how far you need to run your cameras.
While the standard HDMI cords transmit high-quality feeds over 10 meters, a high-grade category 2 cable can transmit high-quality output up to 15 meters.
HDMI cables are fantastic. Unfortunately, not all of them can meet your distance requirements. This brings us to the next important consideration: how to increase the distance of an HDMI signal?
How can I increase the distance of my HDMI signal?
There are various options available if you need to increase the HDMI signal distance without deteriorating the video quality. Here are some of them:
- Active Copper Cable – Using an active copper HDMI cable, you can easily extend the HDMI signal to 20 meters. Such a cable comes with a built-in chip to increase the signal. But take care as you use it because copper HDMI is a bit too heavy and could be unstable over a long distance.
- HDMI Switches – The primary objective of an HDMI switch is to take multiple sources and send them to a display, you can also use them to extend the range of the HDMI cable.
- HDMI Extenders – An HDMI extender works by regenerating the audio and video it obtains from the device source. Usually connected at the ends of HDMI cables, it can connect two HDMI cables and create a longer HDMI extension. While it depends on the type of extender, a good one can increase your HDMI signal to a length of up to 300 ft.
Pro Tip: When buying an HDMI extender, look for an HDCP-certified one for better results.
- HDMI Repeaters – Also known as a distribution amplifier, an HDMI Repeater extends an HDMI signal by receiving and repeating it from the HDMI source using existing HDMI cables. You can connect two or more cables using a repeater and amplify the signal enabling clear transmission.
- HDBaseT – If you want your HDMI signal to go beyond 100 meters, consider investing in an HDBaseT system. Perfect for those long HDMI runs, the HDBaseT technology uses a standard CAT5 or CAT6 Ethernet cable to extend the HDMI signal without any loss.
Why do I need HDMI connectors for my Live Stream?
First, let’s understand that there are three types of HDMI connectors: Type A (HDMI max), Type C (HDMI mini), and Type D (HDMI micro). The most common type that you will find on most devices is the Type A compatible port. But some cameras have Type C or Type D.
An HDMI connector allows you to use these different port and cable types during your live stream – enabling you to add more equipment to your live streaming rig for enhanced production capabilities.
What else do I need for live streaming?
Before you start your live stream, there are some other components your live streaming studio must-have.
If you want to enjoy the best audio during your live stream, here is a list of some of the best lavalier mics to consider for live streaming.
You'll also want to have enough Internet bandwidth. This helps ensure that your clean HDMi-capable camera produces the best quality picture. Learn more about different upload speeds for live streaming on the major platforms.
Now that I know about clean HDMI for live streams, what’s next?
You have learned about the benefits of having a clean HDMI setup and how you can achieve this. Now go ahead and start your professional live stream with a clean output.