Written by StreamYard
How To Set Up A Three-Point Lighting System: Key, Fill, & Backlighting
Are you looking to improve the quality of your live streams or recorded videos? Maybe you want to use a virtual backdrop or green screen? If so, you should consider setting up a three-point lighting system.
In this article, you will learn how to set up a 3-point lighting system to level up your video production. Because stand-out video quality still hinges on lighting, and that's what a three-point lighting system offers. So, let's help you pull it off with this handy guide.
What Is A Three-Point Lighting System?
A three-point lighting system is a type of lighting setup that taps into three different lights to help light your videos. This setup makes a measurable difference in the video quality with less effort, ensuring your videos (live or pre-recorded) are well lit.
It includes the following lights:
1. Key Light
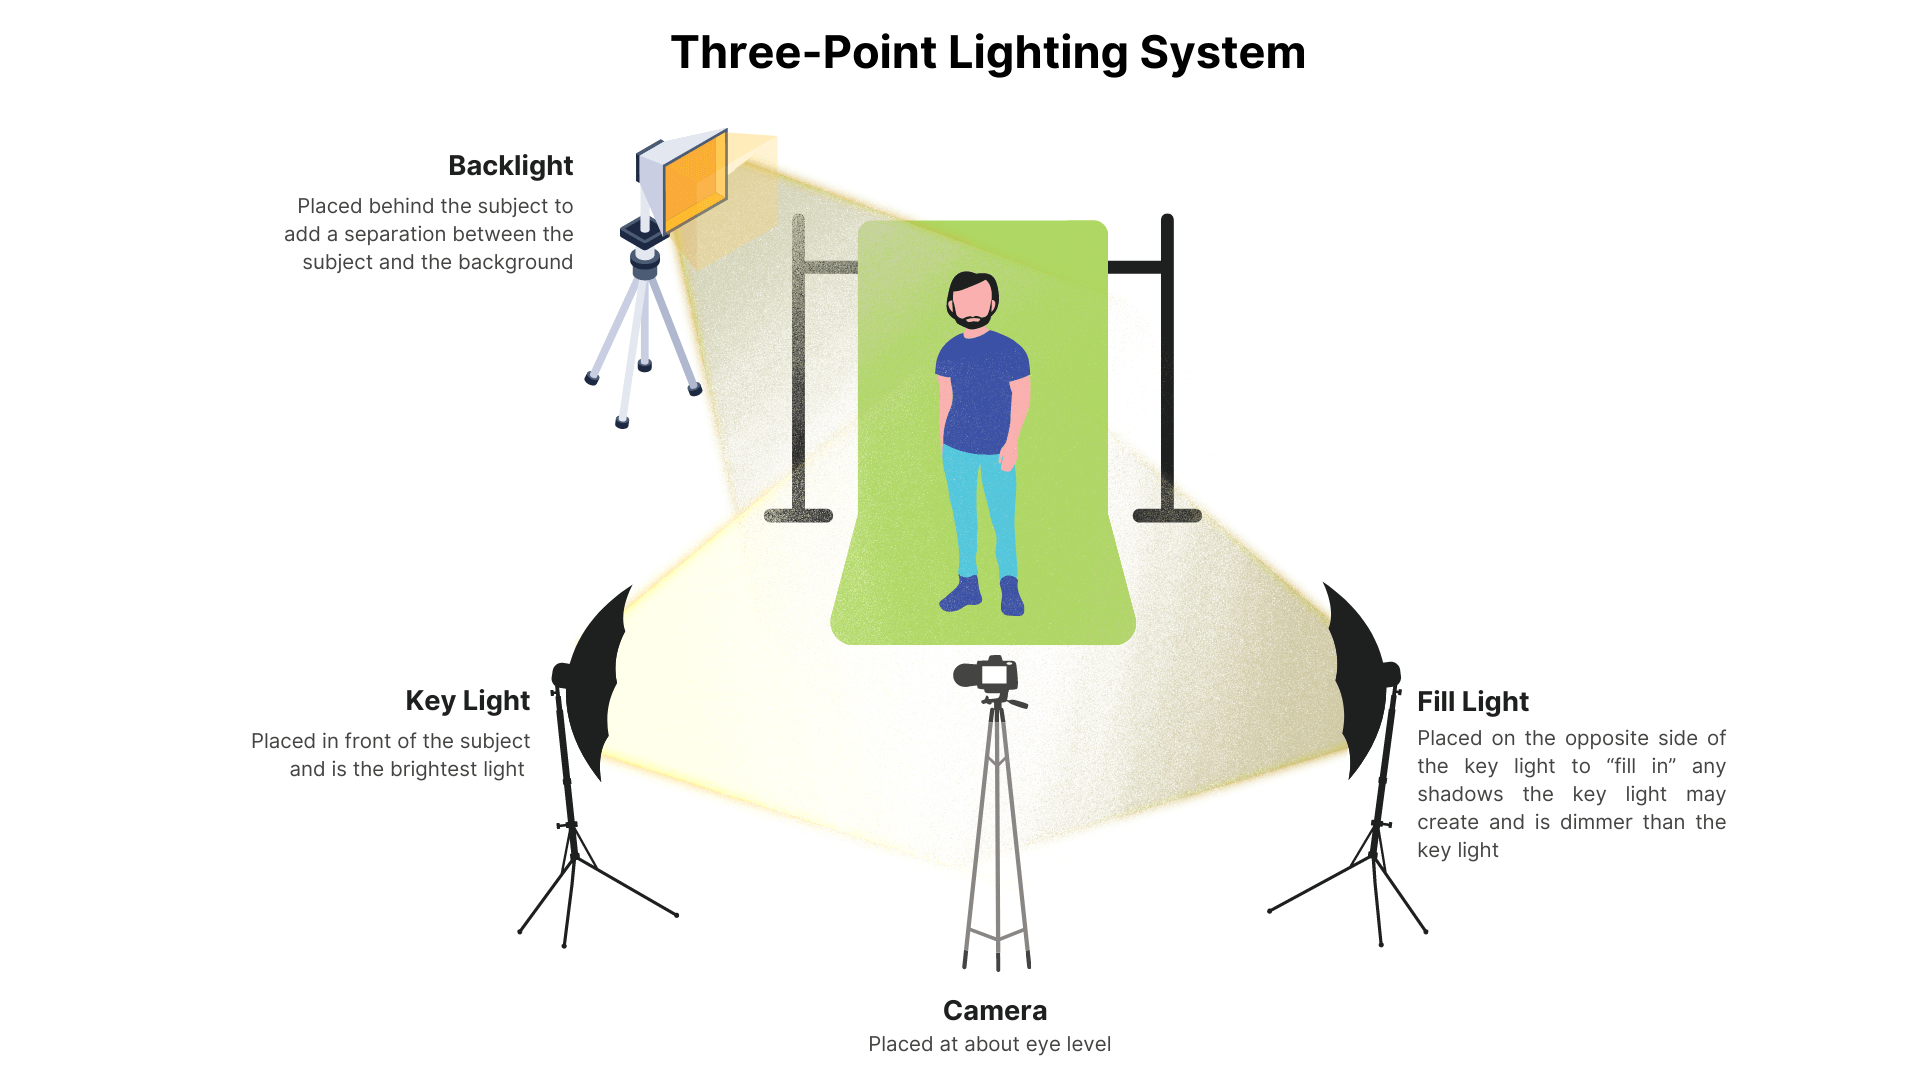
The key light is the primary light in this setup. Typically placed in front of the subject and slightly to one side, often called the smart side, it's the brightest light in the system and illuminates most of your subject. As such, make sure that the light source comes from the front of the subject, and position the other lights on the opposite side to support the key light.
Because this is the light that falls directly on the subject, it's essential to choose a light with different color temperature settings, intensity, and controls for better results. This way you can account for skin tones, your background, and so on. Perfect key light angles range from 15 and 70 degrees. 45 degrees is ideal for most setups.
2. Fill Light
The fill light is also placed in front of the subject but on the opposite side of the key light while setting up a three-point lighting system. Its job is to "fill in" any shadows that the key light may create. This light should be dimmer than the key light and positioned at an angle where it produces some depth while bringing out detail on the subject's other side.
You can experiment with the angle based on the look you want to achieve. If you want a polished, professional look, you may want to put the fill light at an angle identical to the key light and create symmetry. This way the subject is equally lit on both sides.
Another critical parameter here is the intensity. Usually, your fill light's intensity should be over 50-75% of the key light's intensity. You can go up and down this range to create different looks. For example, 90% of intensity here will give a rather even look, but 30% of intensity may create a cinematic effect.
3. Backlight
The backlight, as the name suggests, is placed behind the subject. Its primary objective is to add separation between the subject and the background. However, position it a little higher up to illuminate the subject from top to bottom and make it pop with a sharper outline.
The backlight is often placed at an angle on the same side of the key light, right opposite to it.
Pro Tip: If you wear glasses and are setting up a three-point lighting system, you should also learn how to prevent glare on glasses -- whether live streaming or recording videos. This way, you will be able to look more professional and your audience can see your face, without a reflection.
Why Use A Three-Point Lighting System?
You've likely experienced shadows while creating videos.
Maybe you've faced difficulty while separating the subject from the green screen?
These common video production gaps can be easily filled using a 3-point lighting system. Here are some of the most important benefits of using this system:
- Three-point lighting makes the video or live stream look more professional and polished
- It helps to reduce shadows and makes the subject's face more visible
- If you're using a green screen or virtual background, it will be easier to replace because there will be a better separation between you and the background
- It's instrumental in bringing dimension to the subject
- Using this setup, you can also experiment with different looks; for example, a soft key light may create an optimistic, light mood, while a low key light can help create a dramatic, dark mood
How To Set Up A Three-Point Lighting System?
Now that you know what a 3-point lighting system is, let's look at setting one up. Here are the steps:
- Choose a location for your three-point lighting system. The best place to set up your lights is in a room with white walls or a plain backdrop.
- Be sure there is enough space. If your lights are too close to the subject, they will create hard shadows.
- Place your key light in front of the subject and at least 3 feet away. The key light should be pointed towards the subject's face.
- Position your fill light to the side of the subject at a 45-degree angle. The fill light should be 3-feet away from the subject.
- Place your backlight behind the subject and 3-feet away. The backlight should point towards the back of the subject's head.
- Adjust the lights until you are happy with the results.
Depending on the size of your space, you may need to experiment with the placement of the lights and the distance between the subject and the lights to eliminate any hard shadows
The great thing about setting up a 3-point lighting system is that you shouldn't need to put them up and take them down. But, if you do, consider putting gaffer tape down so that you'll know where to position your lights the next time you're live streaming using StreamYard.
If you're looking for live stream set design and lighting tips, here's a video you must watch:
FAQs On Setting Up A Three-Point Lighting System
Does 3-Point Lighting Require 3 Lights?
Yes. The lights used in a three-point lighting system are a key light, fill light, and backlight (also known as a rim light or hair light). They work together to create a three-point lighting system.
Why Is Three-Point Lighting Important?
Three-point lighting helps to ensure that the subject (or you) is well lit. For example, if you are using a green screen or virtual background, this lighting setup will help make you look more professional when set against a virtual backdrop and create a better definition so that your scene looks more believable. Proper lighting also makes it easier to key out the background and replace it with something else.
Who Should Use A Three-Point Light System?
3-point lighting is a great technique for filmmakers, videographers, photographers, and other visual creatives like live streamers, vloggers, etc.
Wrapping Up
That's all there is to set up a 3-point lighting system! When done right, this system can help light your studio and improve your overall video quality than traditional lighting. So, follow the simple steps mentioned above and take your video quality to the next level.
Don't forget; a three-point lighting system is also great to use with a green screen. Here are some of the best green screens to consider.
For more tips on enhancing your lighting, check out these.