Written by StreamYard
How To Troubleshoot Common Live Streaming Issues: A Comprehensive Guide
Live streams are fun, but unlike recorded videos, they don't give you the flexibility to make edits. This is why, it's worth learning how to troubleshoot common live streaming issues that you may come across.
This guide is created to help you re-invent your live video strategy keeping the common live streaming issues in mind. From blurry video to laggy audio, these are just some of the areas you'll want to keep an eye out for in your broadcasts. With these tips, you'll learn how to troubleshoot common live streaming issues, so that they don't stress you out during your broadcast.
How To Troubleshoot Common Live Streaming Issues
The first thing to remember when you encounter any of these live streaming issues is to remain calm and not panic.
Remember, regardless many of these live streaming issues can affect all users, regardless of their skill level.
Let's take a look at some common issues and how to go about fixing them.
1. Check Your Internet Connection
The faster and more stable your internet connection is, the better your live streaming sessions will go. You'll also be able to broadcast at higher resolutions, with better audio-visual quality. So, if you want to live stream regularly, upgrading your Internet connection to faster speeds is a must-do.
It's typically better to have more internet bandwidth than you'll need. The more devices that you have connected to your network can also affect your broadcast. So before live streaming, be sure to check your internet connection and the recommended upload speeds for different live streaming platforms. You can run a speed test here. Be sure to look for your upload speeds and consider removing devices from your network or upgrading your service to a faster one.
2. Prepare Your Devices
While you don't need to have the latest equipment to create live streams, you can consider optimizing your existing devices or upgrading to devices with better processors, a stronger graphics card (GPU), and cores/threads per processor if you face frequent live stream issues like latency, lags, breakdowns, etc. That's because live streaming may put a high demand on your computer and peripherals.
In addition, if you plan to use a green screen, a virtual background, or more advanced features, you'll want to ensure your computer can keep up. Remember, your computer is doing a lot of the work for you, so it needs enough power.
Here's a look at how to use a green screen.
Thankfully, when you use StreamYard, some of these demands are automatically reduced as StreamYard helps with encoding, automatically adjusting video and audio bitrates, and more.
3. Revisit & Tweak Encoder Settings
Live streaming requires hardware or software encoding -- where RAW video files (native video output files from your DSLR camera or webcam) get converted into an appropriate format for live streaming (on the fly).
There are baseline encoder settings appropriate for live streams. Meanwhile, each destination platform also has basic recommendations for necessary encoder settings (enabling live streams only up to specific resolutions such as 720p or 1080p).
Modern-day encoders (some already come shipped with your device) have numerous options for encoder settings. If you are using encoder software, make sure it's the latest version.
If you face encoder errors, check the CPU load. Also, try and look for audio or video issues. Change them if needed. You may also want to check your internet connection if you face persistent encoder errors.
4. Manage And Organize Scenes & Sources
Do you struggle with running your live stream production? It can be a lot to manage, between bringing in guests, displaying overlays and banners, while also participating in the live stream.
If you find you're juggling a lot, take a look at how you have your live streams organized.
If you find your live streams are complicated and include lots of the following elements, you may want to look into simplifying your broadcst.
Here are some elements that you are likely using:
- Video
- Audio
- Screen sharing
- Presentations or slides
- A second camera angle
- Other videos (such as custom transitions, video clips, B-roll, etc.)
- Images
- Chat
- Overlays
- Lower-thirds and more
The sources are where your video and audio files are sourced from (could be your local computer, a web browser, and more).
If anything, how you set up your studio and sources determines how flawlessly your live streaming goes.
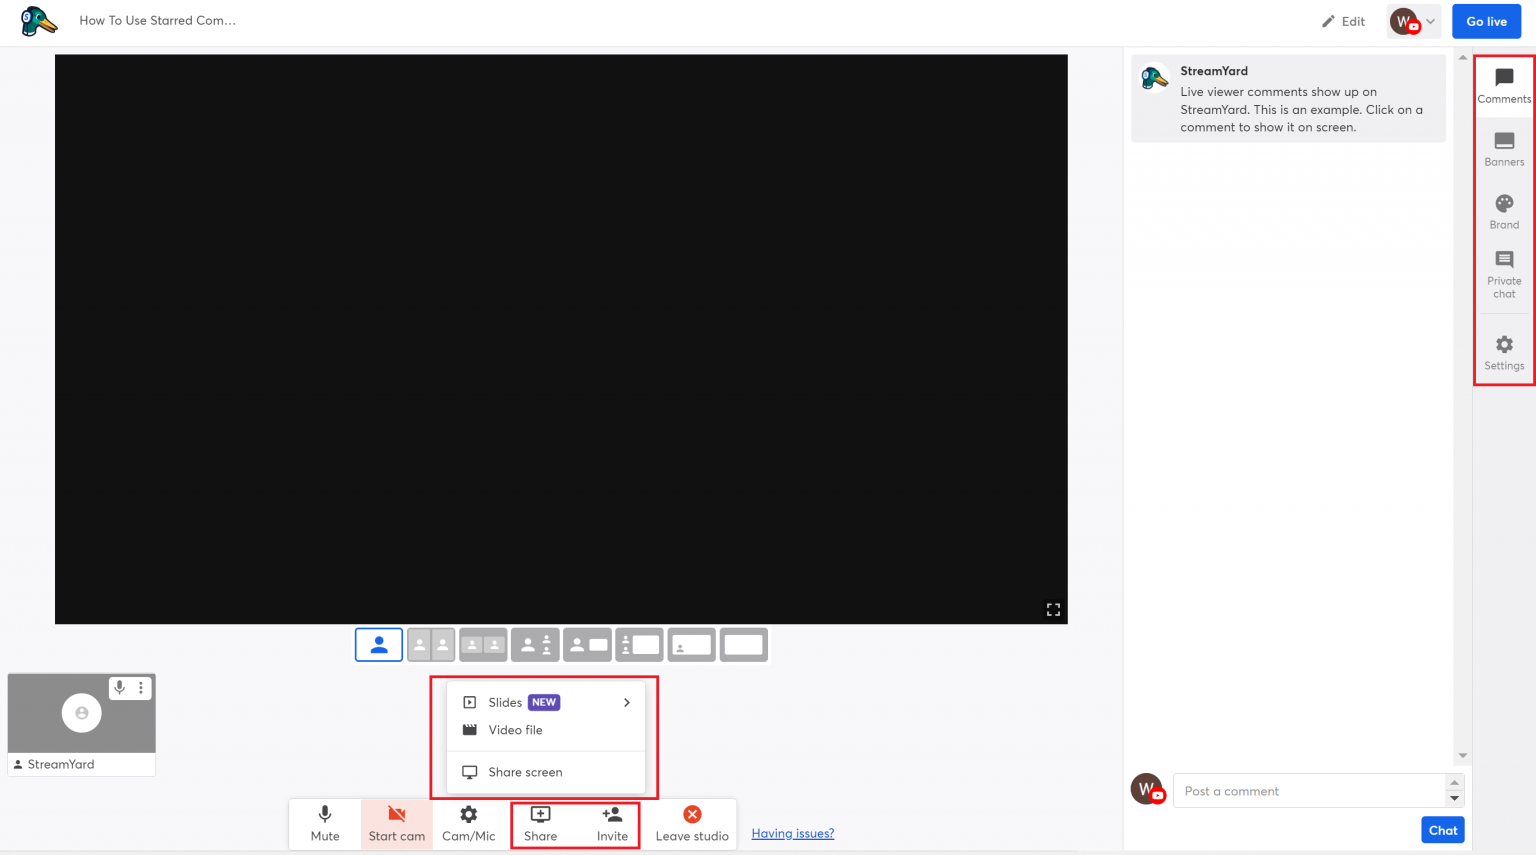
In StreamYard, a lot of these elements are organized under the Banners and Brand tab. Be sure to regularly review the overlays and video clips in your studio and remove ones you're no longer using.
To streamline your broadcast, don't forget that you can also drag to reorder your overlays, video clips, and backgrounds so that they're faster to get to when producing your live streams.
Here is a look at where you can find these elements inside of your StreamYard Studio.
5. Focus On Camera And Audio
Both your audio and video sources are worth a mention. Some of the best live streams are delivered through DSLR cameras mounted on tripods (or tabletops). However, most people do well with webcams and a table-mounted mini-tripod as well.
Irrespective of your choice, be sure to check your video sources -- primary cameras for focusing on the subject (could be you), other cameras (if any), B-roll footage, and other video footage inserted into scenes.
While video is an important part of your live stream, audio is even more important. People accept low-res video quality (for whatever reason), but if the audio is hard to hear, choppy, or you have interference, they might not tune in. If you experience audio issues when live streaming, consider investing in a quality microphone. It could be a USB mic to a full-fledged desk mountable microphone setup.
Take some time to either record a video in StreamYard or review one of your past live streams and listen to your audio to see if there is any noise and then try and work to fix it.
Pro Tip: If you have a guest on, when you're in the backstage area, consider muting each person and then listen for any interference. This will help you pinpoint where it is coming from. You can then spend time diagnosing it before going live.
If you still experience audio issues, feel free to contact our Support Team for help.
6. Lighting For Live Streams
What are some other live streaming issues? How about lighting? The rules are downright simple: not too dark; not too bright.
If you have too much light, you'll appear washed out. If there isn't enough, your camera may struggle and you won't look as good on screen.
To find a good balance, you want to be sure to evenly light your scene.
Instead of hitting yourself directly with the light, you should consider using two lights, one to light the left side and another to light the right side.
For those of you who have windows in your studio, natural light can help brighten your scene, when used properly.
If you have access to a window, be sure to face the window. If the window is behind you, there will be too much light coming in, which can make it difficult for your camera to pick you out.
The key is to have an even lighting distribution to help your viewers see what's happening. Remember, the more evenly distributed the lights are on the subject, the better your video quality.
This applies to using a webcam, your smartphone or a DSLR camera.
7. Choose The Right Live Streaming Software
Your choice of the platform also determines the final quality of your broadcasts. Some of the things that even professional live streamers can go wrong with are automatically resolved if you use live streaming platforms such as StreamYard.
Using browser-based live streaming software, for instance, reduces the need to have the latest and greatest computer or a powerful gaming laptop to live stream.
Rather, you can stream from your laptop, a tablet, or even a mobile device.
By using StreamYard, you can easily avoid most live streaming issues such as setting up complex scenes and sources right, working with the video/audio output settings, and more. StreamYard also optimizes your live stream by using pre-configured audio/video codecs.
Further, you'd have to set up individual scenes and sources (including properties and filters), optimize live stream settings yourself, choose appropriate platform-specific live stream settings on your own, and more.
8. Live Streaming Content, Delivery, & Mistakes
Absolutely everyone makes mistakes when live streaming.
The key thing is not to panic.
To help you reduce any mistakes, it is important to spend time practicing your live streams.
Here is a video on how you can set up a practice live stream and rehearse.
If you're worried about forgetting your intro, I like to use a notes app to jot down the main points that I want to cover. If you want a more advanced way, you can use a teleprompter.
Remember, the massive advantage of live streaming over seemingly error-free and polished recorded videos is that there's that human element of vulnerability. The umms, aahs, forgetting what you had to say for a moment, struggling with hardware/software/lights -- they are a part of what makes live streams fun.
While live streaming, don't fuss over any of these outcomes. Instead, apologize, fix whatever went wrong on your next broadcast, and continue to engage your audience on every new stream.
9. Guest Choices, Lack Of Practice & Slip-Ups
Not all live stream issues come from software and hardware; some have to do with your choices. The choice of guests, for instance.
Doing live panel discussions, joint tutorials, knowledge-sharing live streams, product demonstrations with guests, etc., will require you to think carefully about the guests or who you invite to speak on live streams.
Everyone wants to be invited to be a guest, but will they come prepared?
For example, you don't want to accept just anyone to be a guest on your live stream. You should be working towards providing good, quality content during your broadcast.
One other thing to note about having a guest join you is to make sure they're prepared.
If you find that your guests aren't sharing that they will be on your upcoming live stream, be sure that you are giving them the information ahead of time. This includes a graphic, teaser text, and a link to the broadcast that they share publicly.
Don't expect your guest to be perfect, but make sure you arm them with the information they'll need to prepare for your show.
This could include notes, a link to a past broadcast so that they can understand the format, and so on.
You'll also want to consider who you choose based on whether they are comfortable with the camera, are used to videos or the live streaming format, and more.
Lastly, ensure that you choose to invite people who are the best possible choices for the type of content you're sharing in your live stream.
Just because you need a guest doesn't mean you should invite everyone. Make sure that whoever you have as a guest aligns with what your goals are. This way it can be an intelligent and thought-provoking conversation for your viewers.
10. Lost Camera
Sometimes when you switch between different video applications, your computer may not be able to connect to your webcam, even though it previously worked.
The easiest fix here is to restart your computer and try it again. Chances are that will do the trick!
11. Slow Internet
A lot of times, we forget to restart our computers. They run all of the time and sometimes need a break.
If you notice your computer is running slower than usual, first, consider closing any unwanted tabs and quitting applications that you do not need.
Next, consider restarting your router. You can do this by unplugging the power for around 30 seconds, and then plugging it back in.
Reboot your computer and see if your internet feels snappier.
12. Blurry Camera
If you notice your camera quality looks pixelated, the first thing to try would be to refresh your screen. This can often alleviate this.
Next, if you're using StreamYard, look under Cam/Mic and check the resolution. Make sure you're using the correct camera and also have it set to 720p or 1080p if your camera supports it.
Lastly, restart your computer and check your camera again.
13. A Noisy Environment
Do your live streams sound like you're in a cave? You may need to add some acoustic panels to your space. These can help reduce the sound bouncing around.
Additionally, you can put down a carpet to further deaden your space and help improve how it sounds. This way it's warm and inviting.
The Takeaway
These are just some common live streaming issues that you'll run across. Now you have a good idea of how to address them and fix them if and when they come up.
Creating a smooth live stream doesn't have to be a guessing game. We hope this guide helps you troubleshoot common live streaming issues that you may come across. Remember, if you have other questions about live streaming, you can also join our free StreamYard community and learn best practices from other live streamers.