


Written by StreamYard
How to Create A Call-In Show: 4 Easy Ways
Many of us may remember the genesis of podcasting. In 2006 audio quality and production was not what it is today for podcasters. YouTube was in its infancy, and you had podcasters on one side and video bloggers on the other side. It wasn't until recently the two sides began to emerge.
Yet, in 2006 BlogTalkRadio was at the forefront of audio production. Though its streaming audio bandwidth was only at 32kbps, and it sounded like you were listening in on a phone call instead of a radio show, there is one aspect of BTR that has allowed it to stay afloat for all this time. Not only have they stayed afloat, but they are also able to charge close to $40 a month for 32kbps of sound quality.
How are they able to do this? Because they have one thing other podcasting platforms do not: the ability to allow listeners to call in just like a terrestrial or satellite radio station.
Recently the video streaming community has been asking, “Is this possible to do on StreamYard?”
Today we have Skype, Google Hangouts, FaceTime, Google Voice, Pinger, etc. None of these existed in 2006. And even if they did, not to the extent that it is common to have VoIP access so easily.
In this post, we will show you how to take how to create a call-in show for your live streams using StreamYard without using extra hardware.
How to create a call-in show using Audio Hijack
What you will need are as follows if you are a Mac user using Audio Hijack:
- A StreamYard account
- Download and install Rogue Amoeba's Audio Hijack ($59)
- FaceTime, Google Voice, Skype (with a purchased phone number for your guest and listeners to call into), or any other VoIP
- Download and install Soundflower for free
Rogue Amoeba's Audio Hijack is a versatile tool that will allow you to do various things with your StreamYard stream as well as taking phone calls from your guests and listeners.
Given that StreamYard audio is usually 64kbps, this also gives you the ability to record your stream's audio at a higher bitrate and in WAV. These are all things you can do at the touch of only a few buttons.
First, you will need to download the Rogue Amoeba Audio Hijack app to your Mac. You can do so by clicking here. I would encourage you to download the free trial to see if it works well for you before purchasing the full version.
Step 1: Upon installing Audio Hijack and Soundflower, restart your computer. After restarting, open Audio Hijack and select your source from which your caller's sound is coming from.
For Google Voice, choose Safari. If you choose Chrome while using StreamYard, the sound from your on-screen guests will double.
So, if you plan to use Google Voice for guest call-ins, open Google Voice in Safari while running StreamYard in Google Chrome.

Step 2: In Audio Hijack below your source for callers, drag your microphone or audio interfaces below the source using the “Input Device” option.
Step 3: Besides the source of your callers, drag an Output Device. This output device will allow you to hear your callers. It is best not to make it your mac speakers, instead of where your headphones are plugged in.
Step 4: Apart from both the output devices you connected to your caller source and your microphone source if you wish to record your guests' calls in MP3 or WAV form, drag over the “Recorder” option beside both and choose the recording settings you want.
If you are an audio podcaster, this will help acquire higher quality audio to mix and combine through native recording in this manner.
Step 5: In the middle to the very end, drag another “Output Source” and make sure the lines for both sources are connected to your final output device. Set this output to “Aggregate Device”.
Your final setup on Audio Hijack should look like this below:

Step 6: Hit record on Audio Hijack and go to StreamYard in your web browser. Upon setting up your audio, set your audio device input, your final output on Audio Hijack.
In this case, it will be “Aggregate Device”. You will also want to make your audio output in StreamYard the same audio output next to your caller source.

You are now ready to accept phone calls on your StreamYard video stream using Audio Hijack as well as getting a high-quality native recording of both sides of the conversation you can marry together using your editing software like Audacity or Adobe Audition.
Accepting phone calls using Loopback
When figuring out how to create a call-in show, there's another option. Now, it might be a simpler alternative but it's a more expensive one. It's by using Loopback (also from Rogue Amoeba). The main difference between Audio Hijack and Loopback in terms of output is Loopback doesn't record the conversation within the app.
But you can open Audacity or Adobe Audition, or Logic Pro, and use your output device. You create your input in that recording software.
Check to make sure you have enough RAM to run all these programs smoothly without hiccups.
You can download Loopback here.
What you will need are as follows if you are a Mac User using Loopback:
- A StreamYard account
- Download and install Rogue Amoeba's Loopback ($99)
- FaceTime, Google Voice, Skype (with a purchased phone number for your guest and listeners to call into), or any other VoIP
Step 1: Upon installing Loopback, restart your computer. After restarting open Loopback, click “New Virtual Device”.
Step 2: Click the “+” icon next to the first column titled “Sources” and add the source from which your phone calls are coming from. Like Audio Hijack, if you plan to use Google Voice, open Google Voice in Safari while running StreamYard in Google Chrome so that you don't get doubled audio.
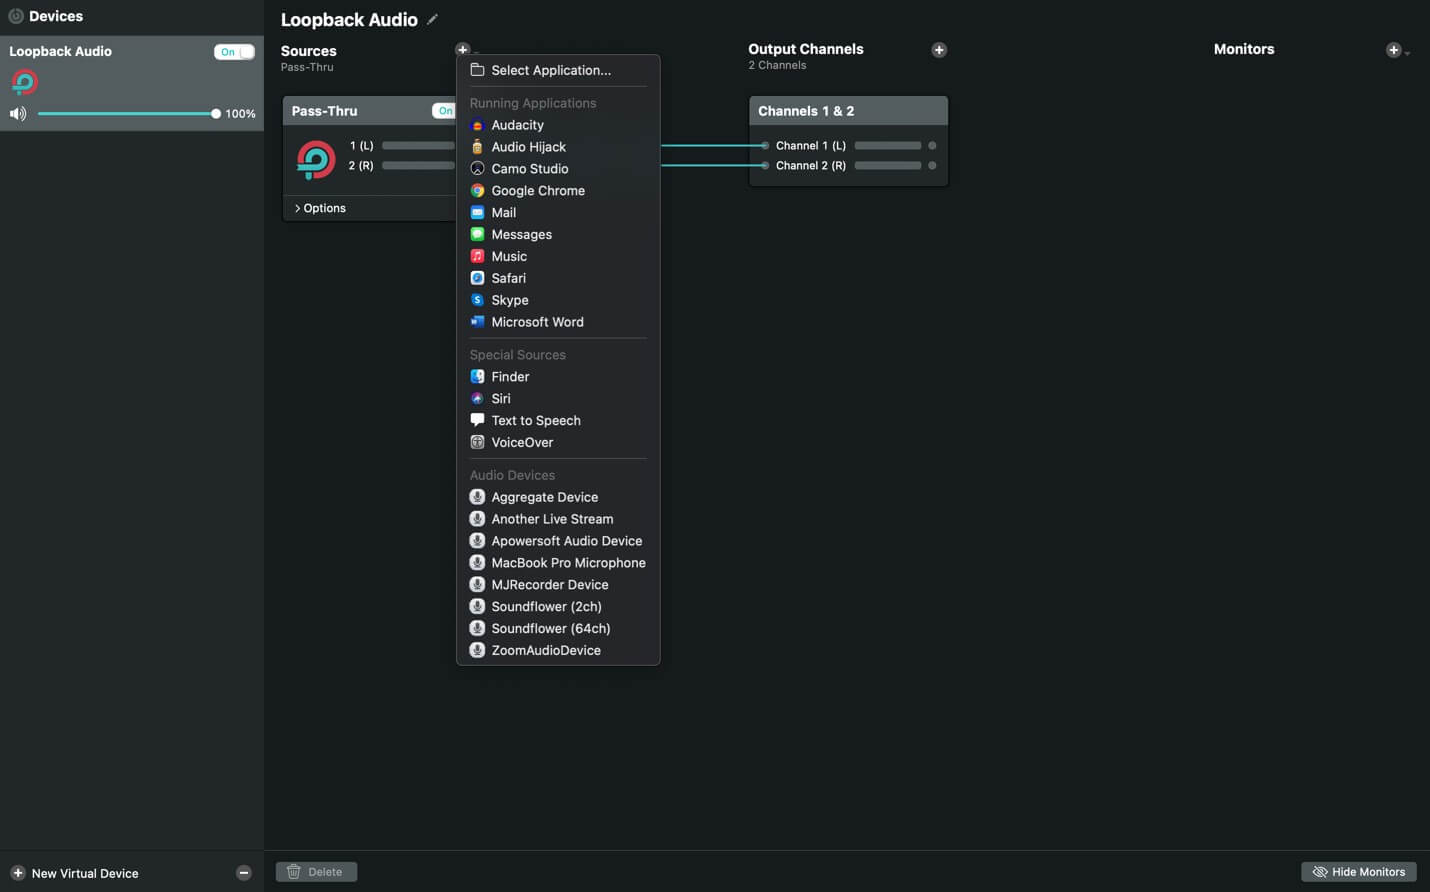
Step 3: Again, click the “+” icon next to “Sources” and add your microphone source. If you need other sources as well, like if you plan to run sound through iTunes and want that to come through to your StreamYard stream, add that or any other source as well. You can add as many as you wish.
Step 4: Also add your “Monitor” in the final column under the “Monitors” section. Your “Monitor” will be your audio interface or wherever your headphones are plugged in. This is where you monitor the sound that is coming through to your StreamYard.
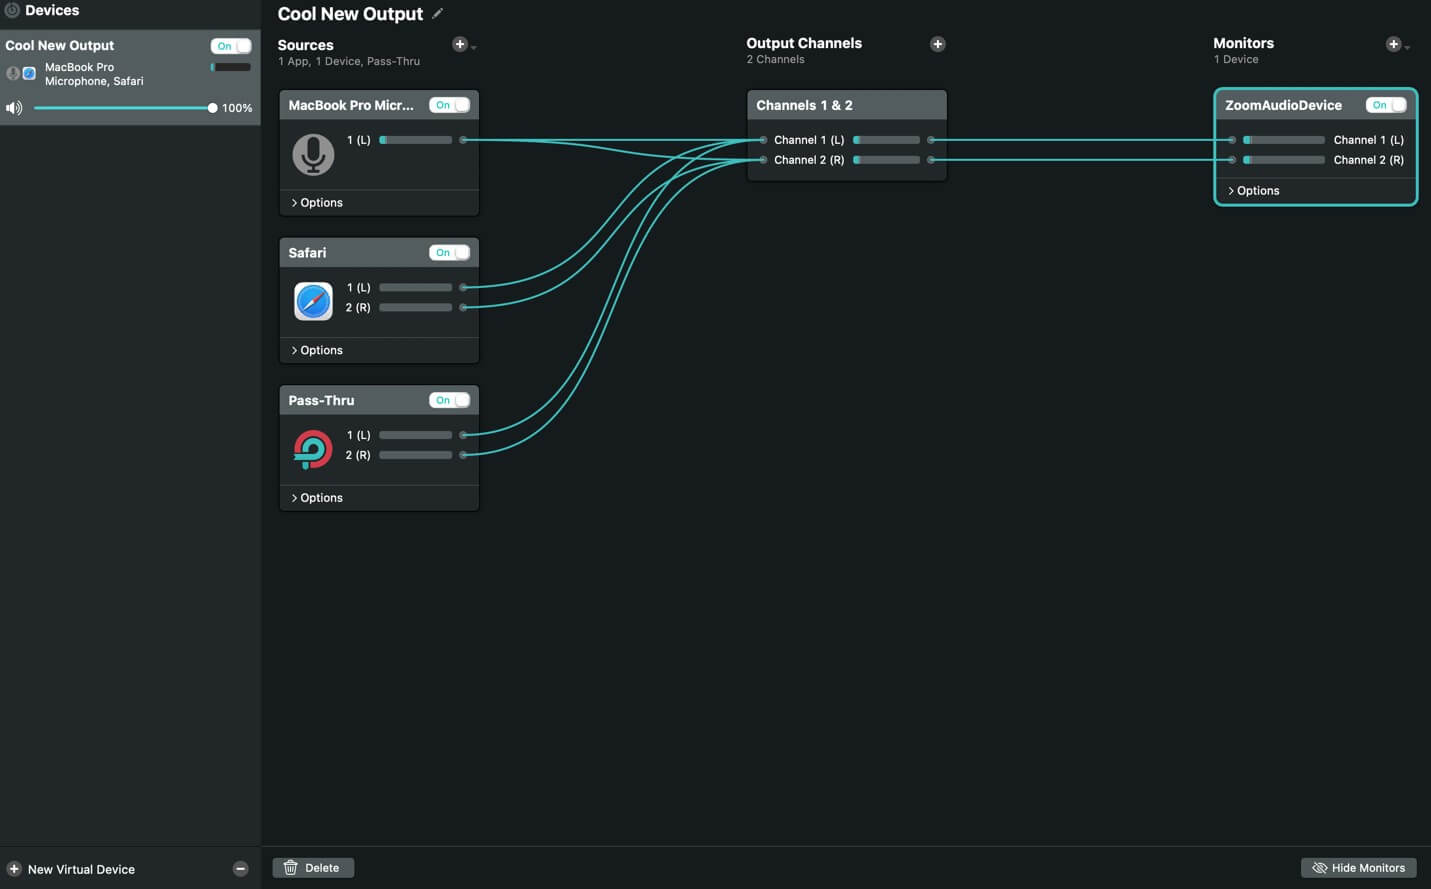
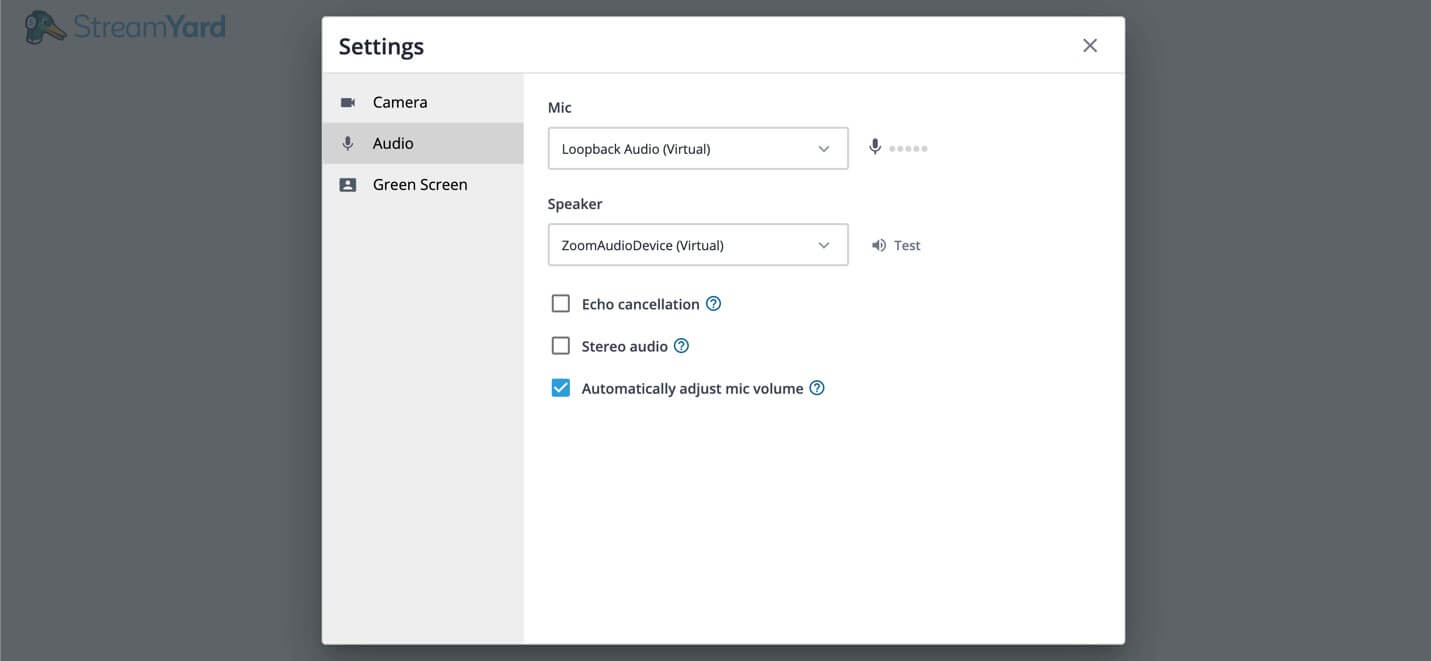
Step 5: Open StreamYard and set your audio input device as the audio input device you have just created using Loopback. Unless you rename it, it will be called Loopback Audio (Virtual). Select your audio output to the same thing selected in your “Monitors” section on Loopback.
Enjoy running your first call-in show using Loopback with StreamYard.
How to create a call-in show with a Windows PC or Laptop
In Windows, the ability to take calls in your live stream on StreamYard is more cost-effective, considering the Windows-based laptops and PCs already have the software to do this. The initial set up is slightly more time consuming than Loopback or Audio Hijack on the Mac. But you will not have to open any apps to achieve the intended purpose.
What you will need are as follows if you are a Windows User:
- StreamYard account
- Stereo Mix in your Recording Devices
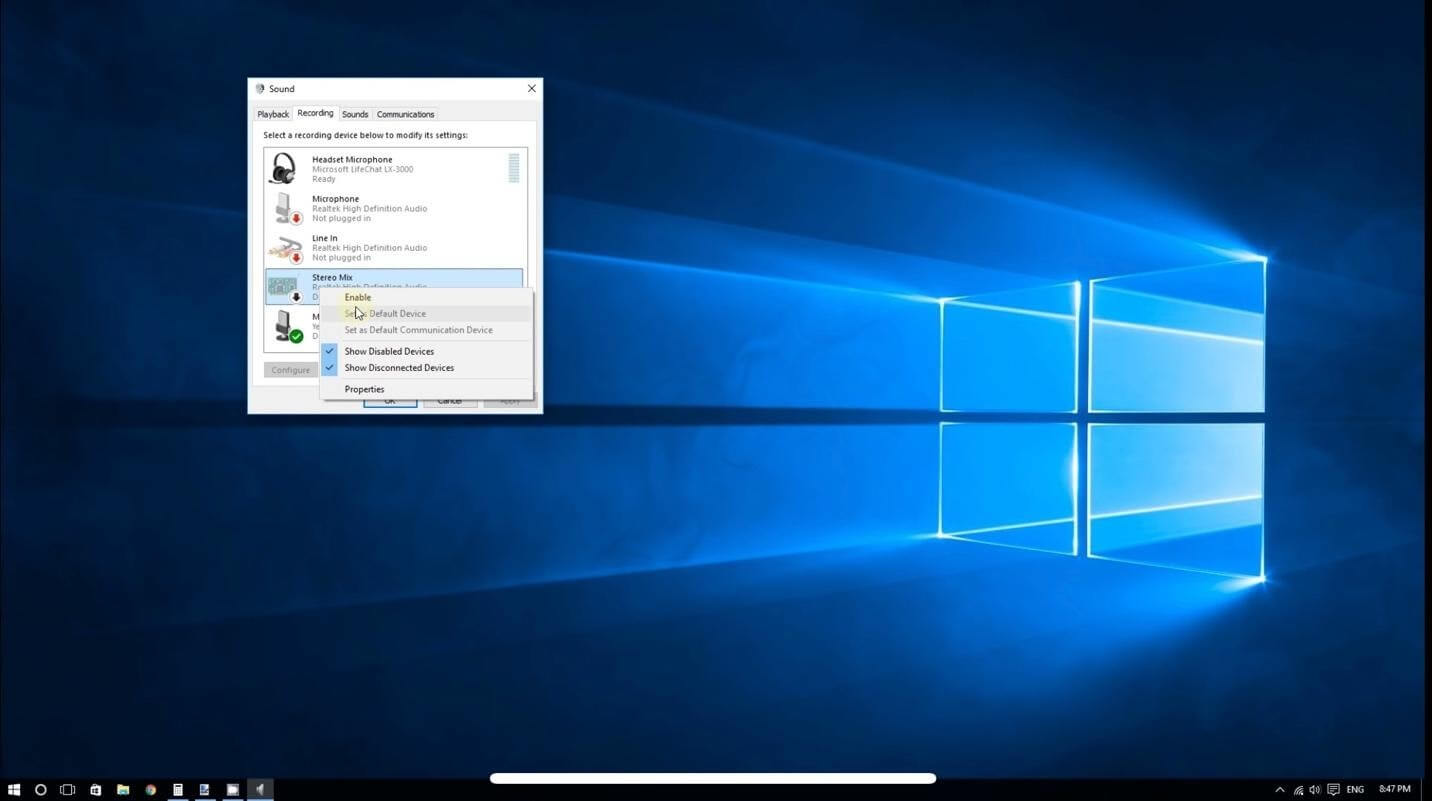
Step 1: Right-click on the speaker at the bottom of your windows computer. Then, click “Recording devices,” and look for “Stereo Mix”.

If “Stereo Mix” is disabled, then it will not show up.
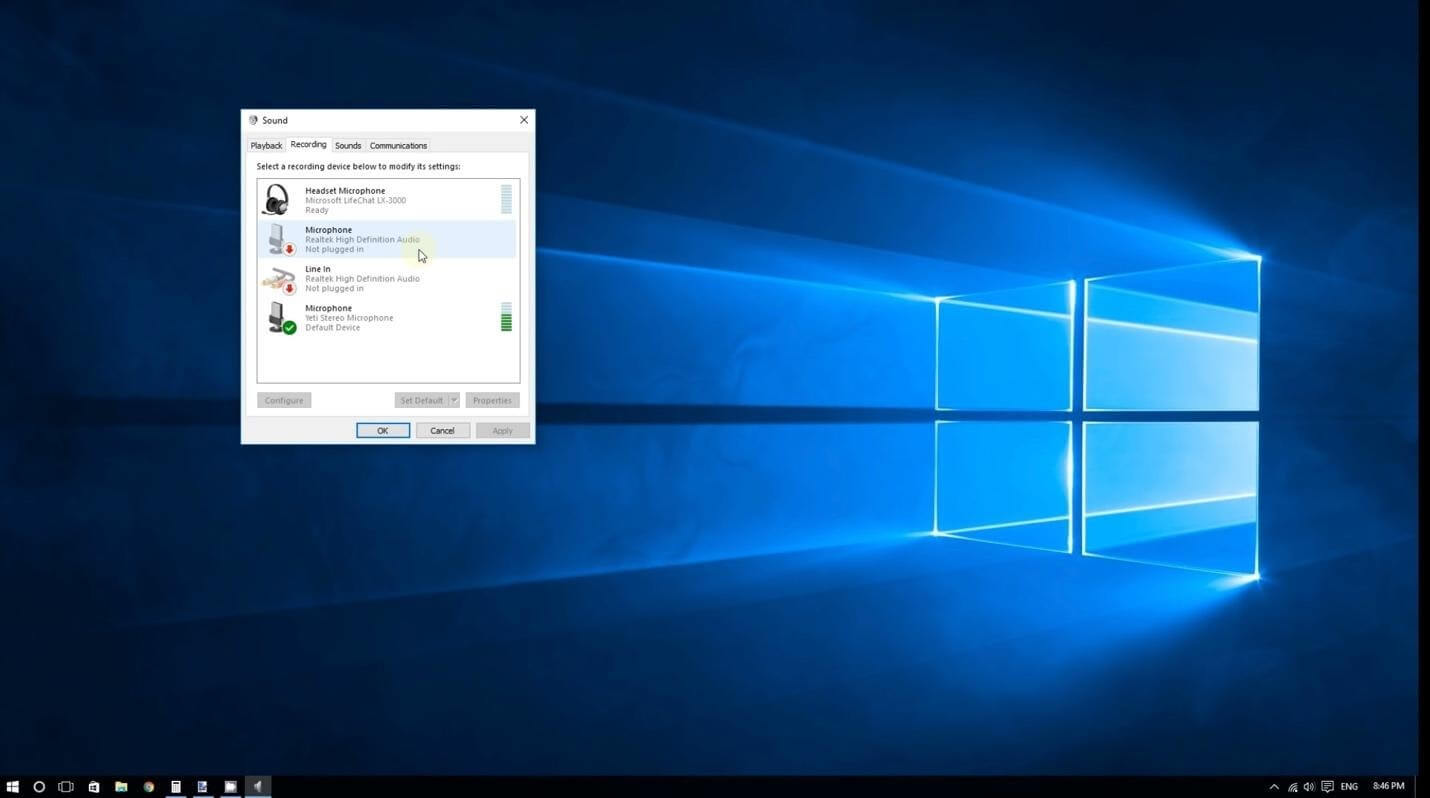
Step 2: If you do not see it in your list, right-click on the white area of the window and click “Show Disabled Devices”.
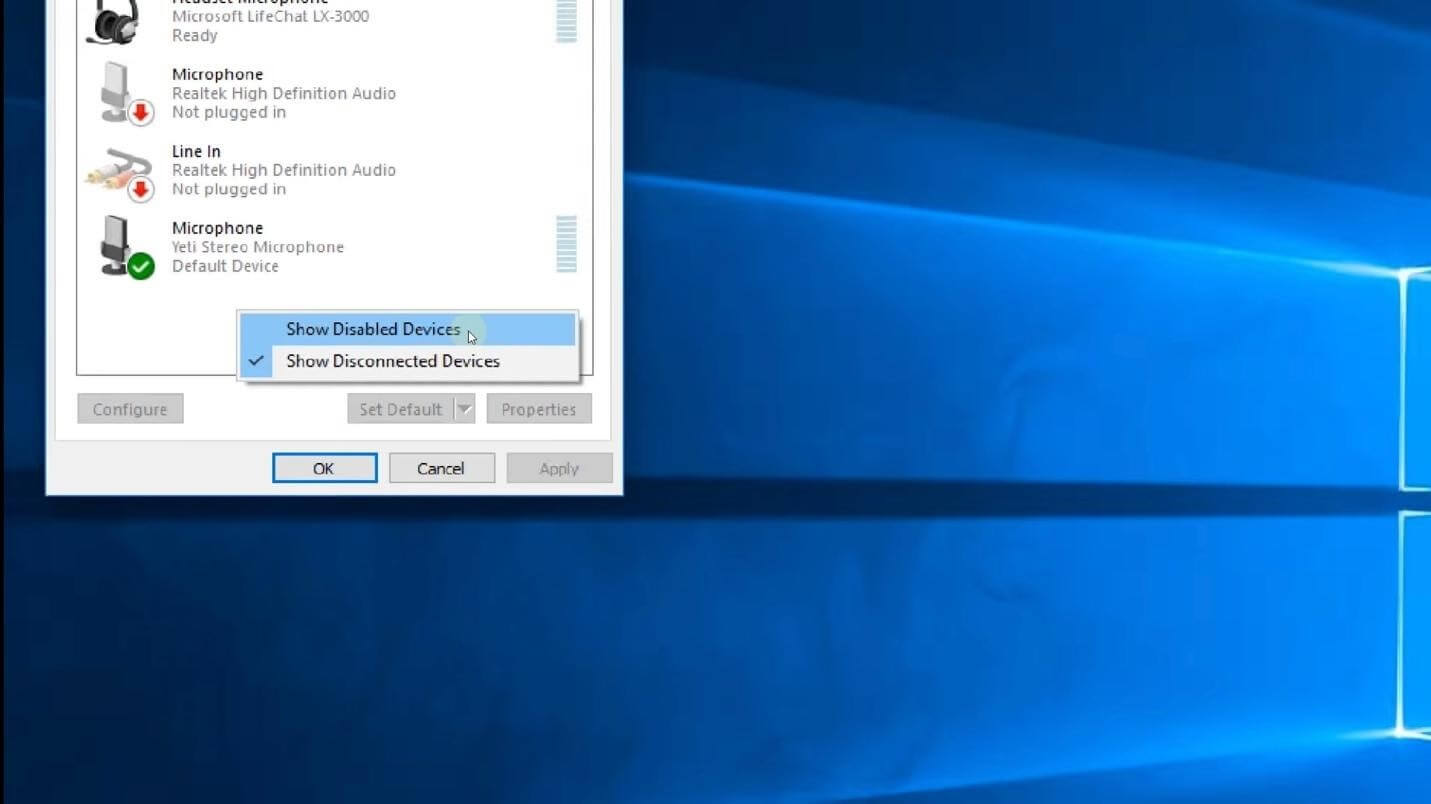
Right-click on “Stereo Mix” when it shows up on the list and click “Enable”.
Step 3: Next, right-click the devices and sources you want to come through to your live stream. This should include the source of your caller audio as well as your microphone. Right-click one at a time and hit “Properties”.

Step 4: Click the “Listen” tab on the pop-up windows for your sources. Also, make sure “Listen to this device” is checked.

Step 5: In the same window, click the “Advanced” tab. Ensure the sample rates for each source match (sources are your mic and your source from where your calls are coming in from).

Step 6: Open StreamYard, and in your audio menu, select “Stereo Mix” for your input. For your output, choose your headphones.
Alternative Hardware for taking calls on Mac or PC
While you are learning how to create a call-in show, there are also hardware alternatives many podcasters use to achieve call-ins. One popular choice is the RØDECaster Pro, which is a boon for serious podcasters. It allows numerous mic inputs along with the ability to plug your cell phone into the mixer. The RØDECaster Pro retails between $500-$600.

Source: RØDECaster Pro
The Zoom PodTrak P4 is also a favorite of Podcasters, and it retails for around $200. Plus, it's portable.

Source: Zoom PodTrak P4
If you rely on hardware instead of software, they are also helpful and can achieve the same results. Both of these work as great audio interfaces as well.
I tend to use the gain hungry Shure SM7B Vocal Microphone, which requires an audio interface. These hardware pieces will give you enough gain to run a gain hungry microphone like a Shure SM7B.
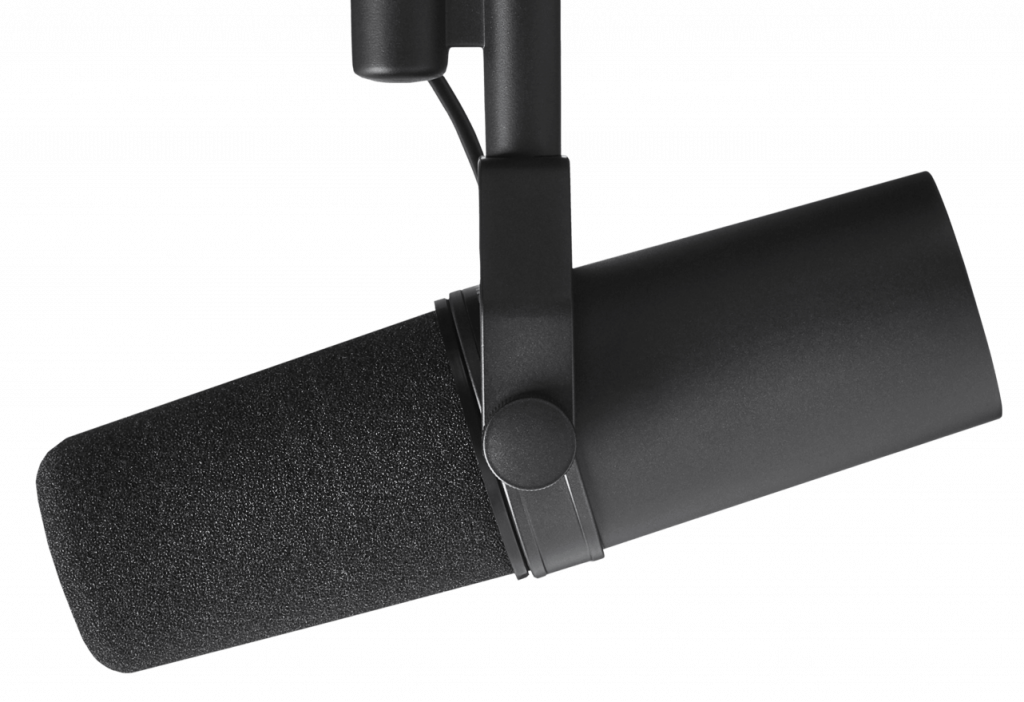
Source: Shure SM7B
Though the RØDECaster Pro and the Zoom P4 are the most popular hardware pieces, there is also a slew of others gaining traction, like the Zoom PodTrak P8 (retails around $500).

Source: Zoom PodTrak P8
The Ammoon 120S-USB 12 Channels Mic Line Audio Mixer Mixing Console has 12 tracks and retails around $120.
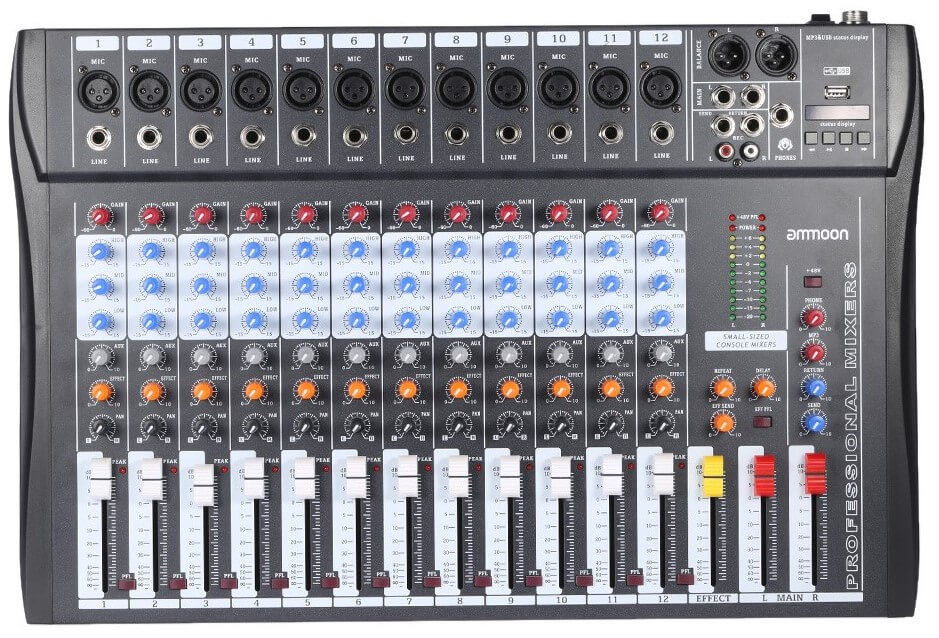
Source: Ammoon
Music Licenses
After learning how to create a call-in show, you may be inclined to add music with copyright into your live stream. If you plan to do so, there are a few things to keep in mind.
The first thing to realize is that radio stations and television stations and movies, and other forms of media can play licensed music because they have licenses to do so, such as a BMI or ASCAP.
Unless you have a BMI or ASCAP for live streaming licensed audio, it is best not to attempt it. There are several reasons this is not encouraged.
For one, if you are monetized on YouTube or other platforms, you will lose monetization from that video or live stream. Also, you are at risk of receiving a copyright strike.
No matter how many subscribers you have, if you have two subscribers or 2 million, your entire YouTube profile or Facebook page could be gone for good after three strikes.
Secondly, in some cases, there could be legal ramifications that could cost a hefty amount to the streamer.
Thirdly, many streaming platforms use the same technology that Shazam uses. Many of you may be familiar with Shazam. Have you ever noticed that within five seconds of a song playing, your phone recognizes the copyrighted material? It is not worth the four minutes of the average time for a song to derail your entire work collection.
Final Thoughts & Tips
Adding live calls to your live stream has great marketing potential and can boost your viewership.
Some final tips:
- Instead of sharing your personal phone number, get a dedicated number on platforms like Skype or Google Voice.
- Use StreamYard's banners to let your audience know you're taking calls.
Good luck!