

Written by StreamYard
How to Use Facebook Live: The Ultimate Guide for Streamers
Curious about how to use Facebook Live to connect with your audience in real time? You are not alone.
With over 3.07 billion monthly active users in 2024, Facebook offers a massive opportunity to reach people, whether you're looking to share updates, host events, or grow your community.
But how do you get started?
Simply hitting "Go Live" isn’t enough to unlock Facebook Live's full potential. You need to know how to prepare, what tools to use, and how to make your streams engaging and professional.
That’s where this guide comes in. We’ll walk you through everything you need to know to start using Facebook Live effectively, whether you’re using native features or enhancing your stream with tools like StreamYard.
In this article, you’ll learn:
- What Facebook Live is and why it matters
- How to prepare for a successful Facebook Live session
- How to create engaging Facebook Live sessions with StreamYard
Ready to get started? Let’s dive in!
What is Facebook Live?
Facebook Live is a feature on the Facebook platform that allows users to broadcast live videos directly from their smartphones or computers to their audience.
Here’s a quick breakdown of what Facebook Live is and how it works:
- Live Broadcasting: Facebook Live enables real-time video streaming, where viewers can engage through comments, reactions, and shares while the broadcast is happening.
- Ease of Access: You can start a live broadcast with just a few clicks from your Facebook page or profile. Facebook Live is built right into the platform, making it accessible to anyone with a Facebook account.
- Engagement Booster: Live videos on Facebook tend to generate more interaction compared to regular posts. This makes Facebook Live a powerful way to connect with your audience, whether you're hosting a Q&A, launching a product, or covering a live event.
- Post-Broadcast Availability: After the live session ends, the video is saved to your timeline. This means your content remains accessible for viewers who missed the live event, extending its reach.
- Versatile Use Cases: Facebook Live is used across various fields—from businesses promoting products and services to educators delivering lessons, and even churches conducting services.
How to Prepare for Your Facebook Live Session
Getting ready for your Facebook Live session involves more than just hitting the "Go Live" button. Proper preparation ensures your broadcast is smooth, engaging, and achieves your goals. Here's how to prepare effectively:
- Plan Your Content: Before going live, decide on the type of content you'll be sharing. Whether it's a Q&A, product demonstration, or an interview, outline the key points you want to cover. This helps you stay on track and keeps your audience engaged. You don’t need a full script, but an outline will prevent you from rambling or losing focus during the broadcast.
- Choose the Right Location: Your setting plays a crucial role in the quality of your broadcast. Select a quiet, well-lit location where your audience can see and hear you clearly. Ensure you have a strong internet connection, preferably using Wi-Fi or a wired connection to avoid interruptions during the stream.
- Test Your Equipment: Before going live, test your camera, microphone, and any other equipment you plan to use. Consider doing a private test run on Facebook to check your setup. This helps you identify and fix any technical issues, ensuring your broadcast looks and sounds professional.
By following these steps, you'll be well-prepared to deliver a compelling and professional Facebook Live session.
Now, let’s explore the two easy methods for going live on Facebook.
How to Use Facebook Live Without Third-Party Apps [Method 1]
Using Facebook Live natively is straightforward and perfect for anyone wanting to broadcast without additional tools.
Here’s a step-by-step guide on how to use Facebook Live from both your mobile device and desktop.
Go Live on Facebook from a Mobile Device
- Open the Facebook Mobile App: Log into your Facebook account on your iPhone or Android device.
- Create a Post: Tap on the "What’s on your mind?" box to start creating a new post.
- Select Live Video: Tap the "Live Video" option from the list. If this is your first time, you’ll need to grant Facebook access to your camera and microphone.
- Choose Your Audience: Use the privacy settings to select who can view your live stream. Options include Public, Friends, or a custom list.
- Add a Description: Write an engaging description for your broadcast. This helps set expectations for your viewers and can encourage more people to join.
- Go Live: Once everything is set up, tap the "Go Live" button to start your broadcast.
- End the Broadcast: When you’re done, tap "Finish" to end the stream.
Go Live on Facebook from a Desktop
- Log into Facebook: On your web browser, go to your Facebook profile, page, group, or event where you want to go live.
- Select Live Video: Click on the "Go Live" option at the top of your news feed or in the post creation area.
- Configure Your Settings: On the Facebook Live Producer page, choose your camera and microphone settings. You can also add a title, description, and tags to your video.
- Go Live: When ready, click the "Go Live" button to start broadcasting. Make sure to interact with viewers through comments and live reactions.
- End the Broadcast: Click "End Live Video" when you’re finished.
How to Set Up Facebook Live with StreamYard [Method 2]
Using StreamYard to go live on Facebook offers you a more polished and professional live streaming experience.
Whether you’re hosting an interview, sharing a presentation, or simply engaging with your audience, StreamYard provides a suite of tools that make your broadcast stand out.
Here's a step-by-step guide on how to use Facebook Live with StreamYard.
Step 1: Set Up Your StreamYard Account
If you haven't already, sign up for a StreamYard account. It's free to start, and you can upgrade later for more features.
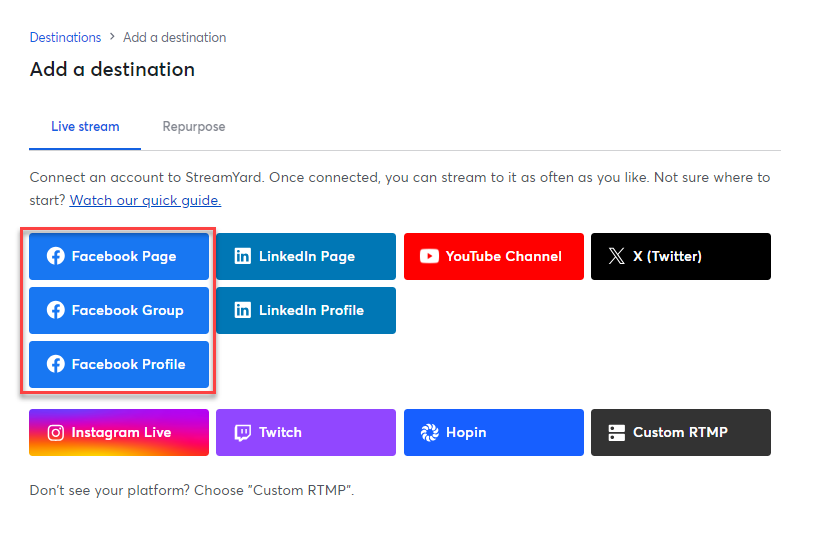
Once your account is set up, head to the "Destinations" page in StreamYard. Click "Add a Destination" and select "Facebook." You can connect your profile, page, or group.
Step 2: Create and Schedule Your Broadcast
Click "Home" on the StreamYard dashboard and select "Live Stream."
Select Facebook as your destination. If you want to stream to multiple platforms at once, you can add those destinations as well.
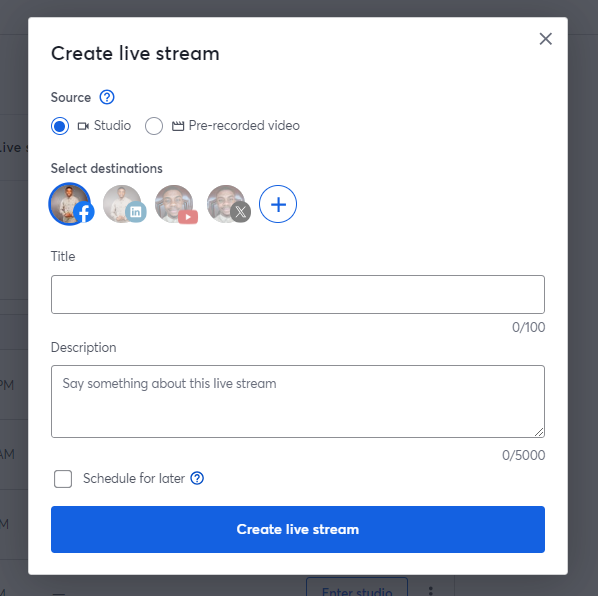
After choosing the streaming destinations, write an engaging title and description for your broadcast. This will appear on your Facebook live stream, so make sure it’s compelling.
If you want to promote your stream in advance, select "Schedule for later" and choose a date and time. You can also upload a custom thumbnail to make your stream stand out in feeds.
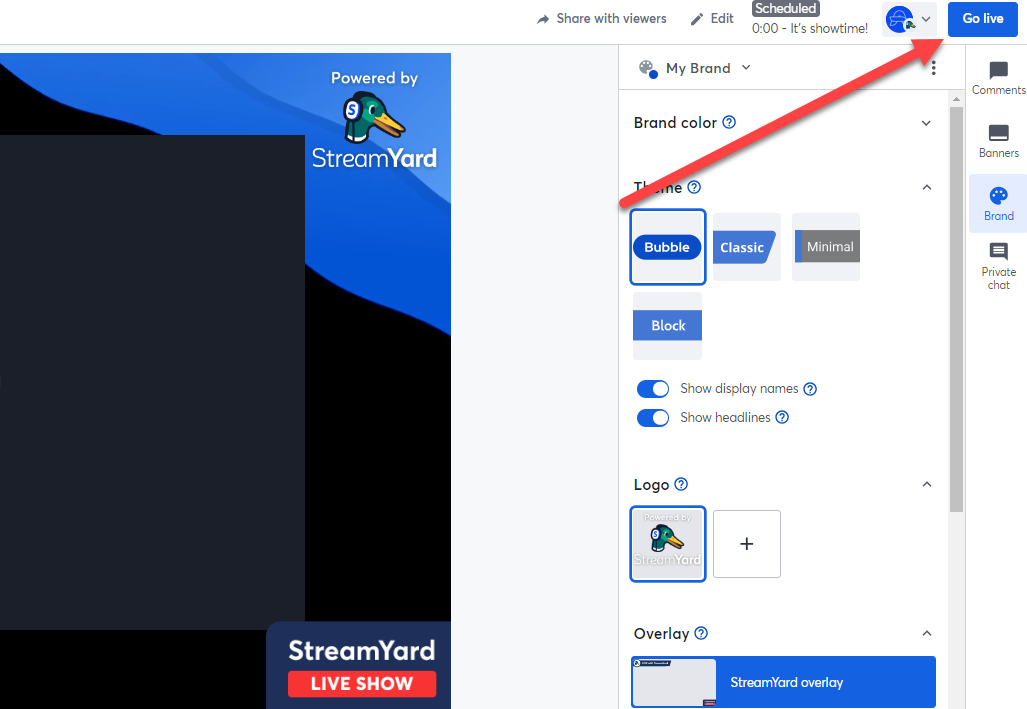
Step 3: Customize Your Stream
Before you go live, enter the StreamYard studio to set up your broadcast. Here, you can adjust your camera and microphone settings, add banners, and customize the layout.
StreamYard allows you to add logos, overlays, and backgrounds to your stream. Take advantage of this feature to brand your stream.
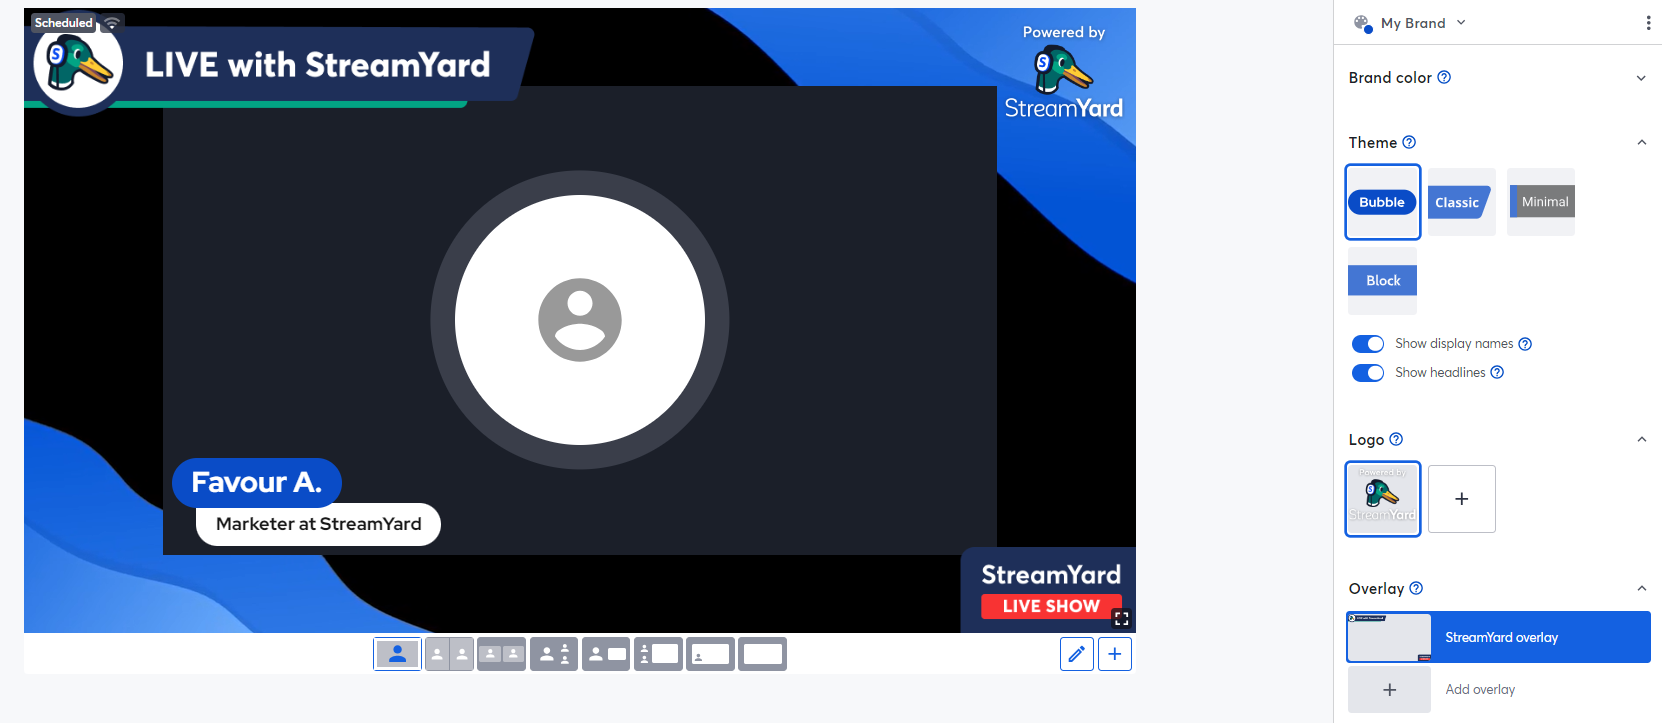
If you plan to have guests, send them a link to join your broadcast. StreamYard allows you to host up to 10 people on screen (depending on your plan).
Step 4: Go Live
Before going live, double-check your settings. Make sure your camera, microphone, and any shared screens are working correctly.
When you’re ready, click the "Go Live" button. StreamYard will start broadcasting to your selected Facebook destination.
While streaming, use StreamYard’s tools to highlight comments, switch between camera angles, and display banners.
Step 5: End and Share Your Broadcast
When you’re finished, click "End Broadcast." Your video will be saved on Facebook, and you can share the replay link with your audience.
If you’re on a paid plan, you can download the recording of your stream from StreamYard, and use the content to create short clips or for future promotions.
Why Use a Third-Party Tool Like StreamYard for Facebook Live?
While Facebook Live offers robust features for streaming directly on the platform, third-party tools like StreamYard can significantly enhance your live streaming experience.
Here’s why StreamYard stands out as a valuable addition to your live streaming toolkit:
1. Multistreaming Capabilities
With StreamYard, you’re not limited to broadcasting on just one platform.
StreamYard allows you to multistream across multiple platforms, including YouTube, LinkedIn, and X (Twitter), alongside Facebook.
This feature expands your reach, helping you connect with a broader audience without the need for separate streams.
2. Enhanced Professionalism
StreamYard offers a range of professional features that elevate the quality of your broadcasts. You can add custom overlays, backgrounds, logos, and banners, all of which contribute to a polished, branded experience.
The ability to manage these elements directly within the platform means you can keep your audience engaged with visually appealing content.
3. Interactive Audience Engagement
Engaging with your audience is key to a successful live stream. StreamYard makes it easy to highlight viewer comments on screen and even bring guests onto your stream in real time. These features help make your streams more engaging.
4. Ease of Use and Accessibility
StreamYard is designed with simplicity in mind, making it accessible even for those without extensive technical knowledge.
Our platform is entirely web-based, meaning there’s no software to download, and it’s incredibly intuitive to set up and use.
This user-friendly interface allows you to focus more on your content and less on technical hassles.
5. Reliable and Stable Streaming
Technical glitches during a live stream can be frustrating for both the host and the audience.
StreamYard provides a stable and reliable streaming experience, reducing the likelihood of interruptions.
Our robust infrastructure ensures that your broadcast runs smoothly, even when streaming to multiple platforms at once.
Best Practices for a Successful Facebook Live
Here are seven best practices to follow to ensure that your Facebook Live sessions are engaging and professional:
1. Test Everything Before Going Live
Before you hit the "Go Live" button, run a quick test to ensure all your equipment works correctly. Check your camera, microphone, and internet connection to avoid technical difficulties during the stream.
Also, consider doing a private live session by selecting "Only Me" in the privacy settings to preview how your broadcast will look and sound. This helps catch any issues with lighting, audio clarity, or framing.
2. Create an Engaging Title and Description
Your title and description are the first things viewers will see, so make them count. Craft a catchy title that grabs attention and clearly states what your broadcast is about. Use keywords that resonate with your target audience.
For example, instead of "Live Stream Q&A," use something like "Ask Me Anything: Live Q&A on Digital Marketing Strategies." This attracts viewers and also improves discoverability.
3. Promote Your Broadcast in Advance
Build anticipation by promoting your Facebook Live ahead of time.
Share the event details on your social media profiles, send out email newsletters, and create a countdown post. You could even use a teaser video to give your audience a sneak peek of what to expect.
For example, if you're launching a new product, share a short clip highlighting its features to generate excitement.
4. Engage with Your Audience in Real-Time
Interaction is key to a successful Facebook Live.
Encourage viewers to comment, ask questions, and share the broadcast. Acknowledge viewers by name as they join and respond to their comments in real time.
For example, you can ask, "Where is everyone tuning in from today?" and read out a few responses live.
5. Use Visual Aids and On-Screen Text
Enhance your broadcast by incorporating visual aids like slides, images, or videos.
StreamYard and other third-party tools make it easy to share your screen or add on-screen text, such as banners or lower-thirds.
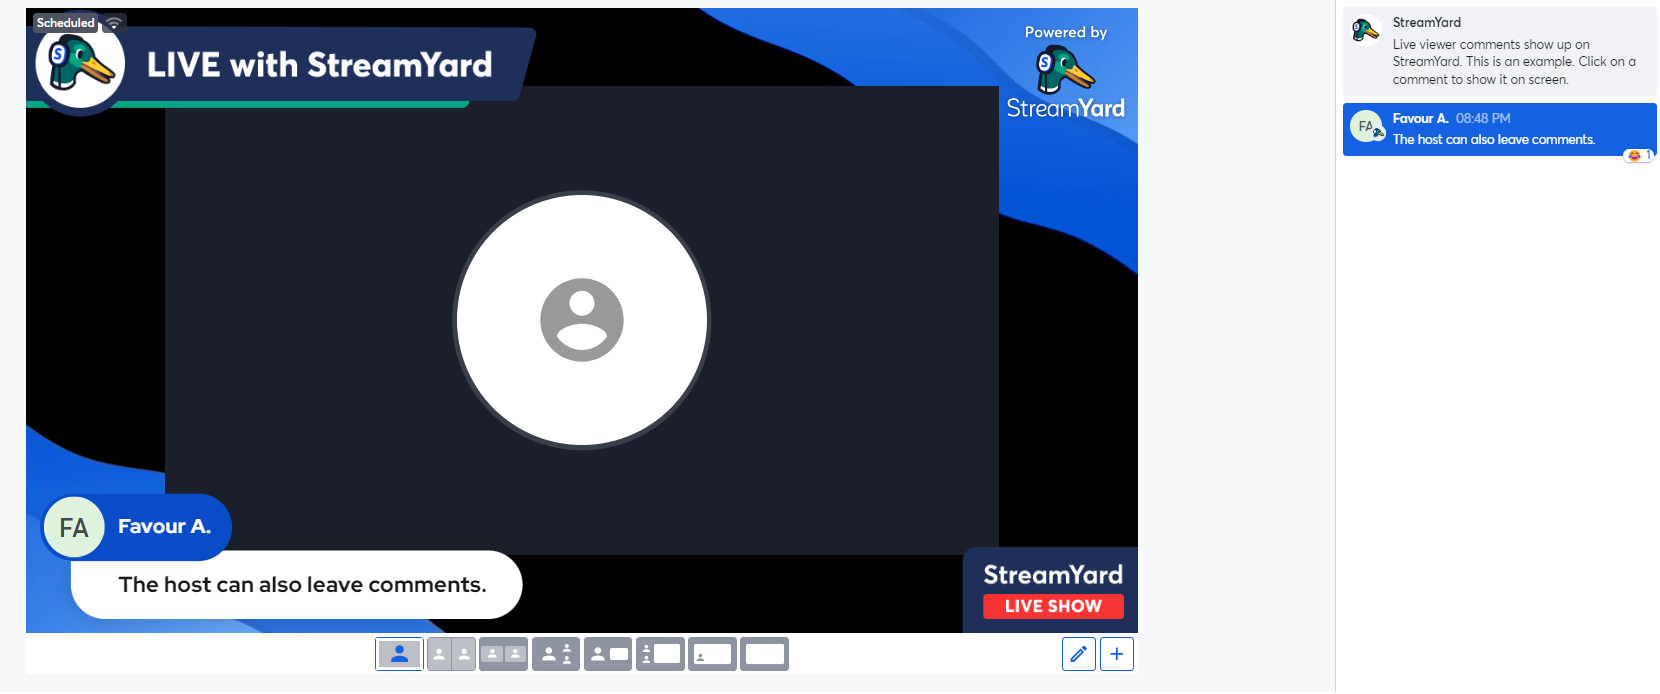
These visuals can help emphasize key points, guide viewers through your content, and make your broadcast more visually appealing.
6. Keep Your Broadcast Structured
Maintain a clear structure to keep your audience engaged from start to finish.
Start with a brief introduction, outline what you’ll cover, and then dive into the main content. Break your broadcast into segments with clear transitions.
For instance, you might start with a welcome message, move into a product demo, and then open the floor for a Q&A session. This helps viewers follow along and stay engaged.
7. Encourage Replays and Sharing After the Broadcast
Once your live session ends, encourage viewers to share the replay with their networks.
Facebook allows you to save your live video to your profile or page, making it accessible to those who missed the live event.
To maximize reach, edit the post to include timestamps for key segments, add a call to action in the description, and share the link across your social media channels.
For example, you could say, "Missed the live stream? Catch the replay here and learn how to optimize your social media strategy!"
Conclusion
Facebook Live is a powerful tool for connecting with your audience in real time. It enables you to share your message, showcase products, and build stronger relationships with your followers.
But here’s where it gets even better:
Integrating a third-party tool like StreamYard can help take your Facebook Live streams to the next level. It's easy to use, and you can start for free.
Ready to create professional and engaging Facebook Live streams with StreamYard? Create your free account today and experience the difference StreamYard can bring to your streaming experience.
FAQs
Is Facebook Live free?
Yes, Facebook Live is free to use, whether you're streaming from your profile, page, or group. If you use third-party tools like StreamYard to enhance your broadcast, additional costs may apply based on the features you choose.
What equipment do I need for Facebook Live streaming?
All you need is a smartphone or computer with a camera and microphone. For higher quality, consider using an external webcam, microphone, or tripod. Tools like StreamYard allow you to integrate slides, multiple cameras, and more.
How do I live stream on Facebook?
Go to your profile, page, or group, click "Live Video," and follow the prompts to add a title, description, and set your audience. Hit "Go Live" when you're ready. StreamYard can help you stream across multiple platforms at once.
How do I share my Facebook Live?
Promote your broadcast beforehand by sharing a scheduled event link. After the live stream, Facebook will prompt you to automatically save the video on your timeline or page, allowing you to share the replay link with your audience.
How can I schedule a Facebook Live broadcast in advance?
On Facebook, click "Live Video," then "Schedule for Later." Set your date, time, and add a title and description. With StreamYard, you can schedule broadcasts across multiple platforms simultaneously for wider reach.