


Written by StreamYard
How to Create a Webinar: A Comprehensive Step-by-Step Guide
Webinars are a powerful way to connect with your audience, share knowledge, and grow your business. But creating a webinar that stands out takes more than just a great idea—it requires strategic planning and flawless execution.
In this guide, we’ll walk you through the step-by-step process of creating a successful webinar. From defining your objectives to captivating your audience during the live event, you'll learn the essentials you need to deliver a webinar that leaves a lasting impression.
Here’s what we’ll be covering:
- How to prepare effectively to ensure a smooth and impactful webinar
- A detailed walkthrough on going live with StreamYard
- Proven best practices for hosting webinars that drive results
Excited to dive in? We are too!
Let’s get started.
Preparing for a Flawless Webinar
Creating a webinar that not only informs but also impresses and engages your audience starts with thorough preparation. Let's explore the steps you'll need to nail down the basics before you go live.
1. Define Your Objectives
First things first, what do you want to achieve with your webinar? Are you looking to generate leads, provide training, or perhaps introduce a new product?
Clear objectives will guide every decision you make—from the content you deliver to the audience you target.
For example, if your goal is lead generation, your webinar should include compelling calls-to-action and be targeted towards a specific segment of your market.
2. Choose a Relevant Topic
Now, how do you decide on a topic?
Well, the goal is to settle for one that resonates with your audience and also aligns with your brand’s expertise.
One great way to pinpoint a topic is by using customer feedback or questions frequently asked by your audience.
For example, if you're a SaaS company specializing in project management tools, a fitting webinar topic could be "Optimizing Workflow Efficiency with Automation."
3. Create a Webinar Outline
Got your topic? Great, let’s outline it.
This blueprint should detail the key points you’ll cover and the flow of the presentation.
Start with a strong introduction to hook your audience, then segment the content into manageable chunks, each with its own mini-conclusion to reinforce the learning points.
Remember, a structured outline helps keep your webinar focused and your audience engaged.
4. Select the Right Date and Time
Timing is crucial. Consider the geographic distribution of your audience. If they’re spread across multiple time zones, choose a time that maximizes attendance, typically during midweek and midday according to webinar attendance statistics.
Also, avoid major holidays or dates when industry events are happening, which could affect turnout.
5. Assemble Your Team
You’re not going solo, are you?
Depending on the scale of your webinar, you might need a host, a presenter, and perhaps a technical support person.
The host can engage with the audience, introducing the presenter and fielding questions, which allows the presenter to focus solely on delivering great content.
Also, technical support is crucial to handle any glitches that might arise during the live session.
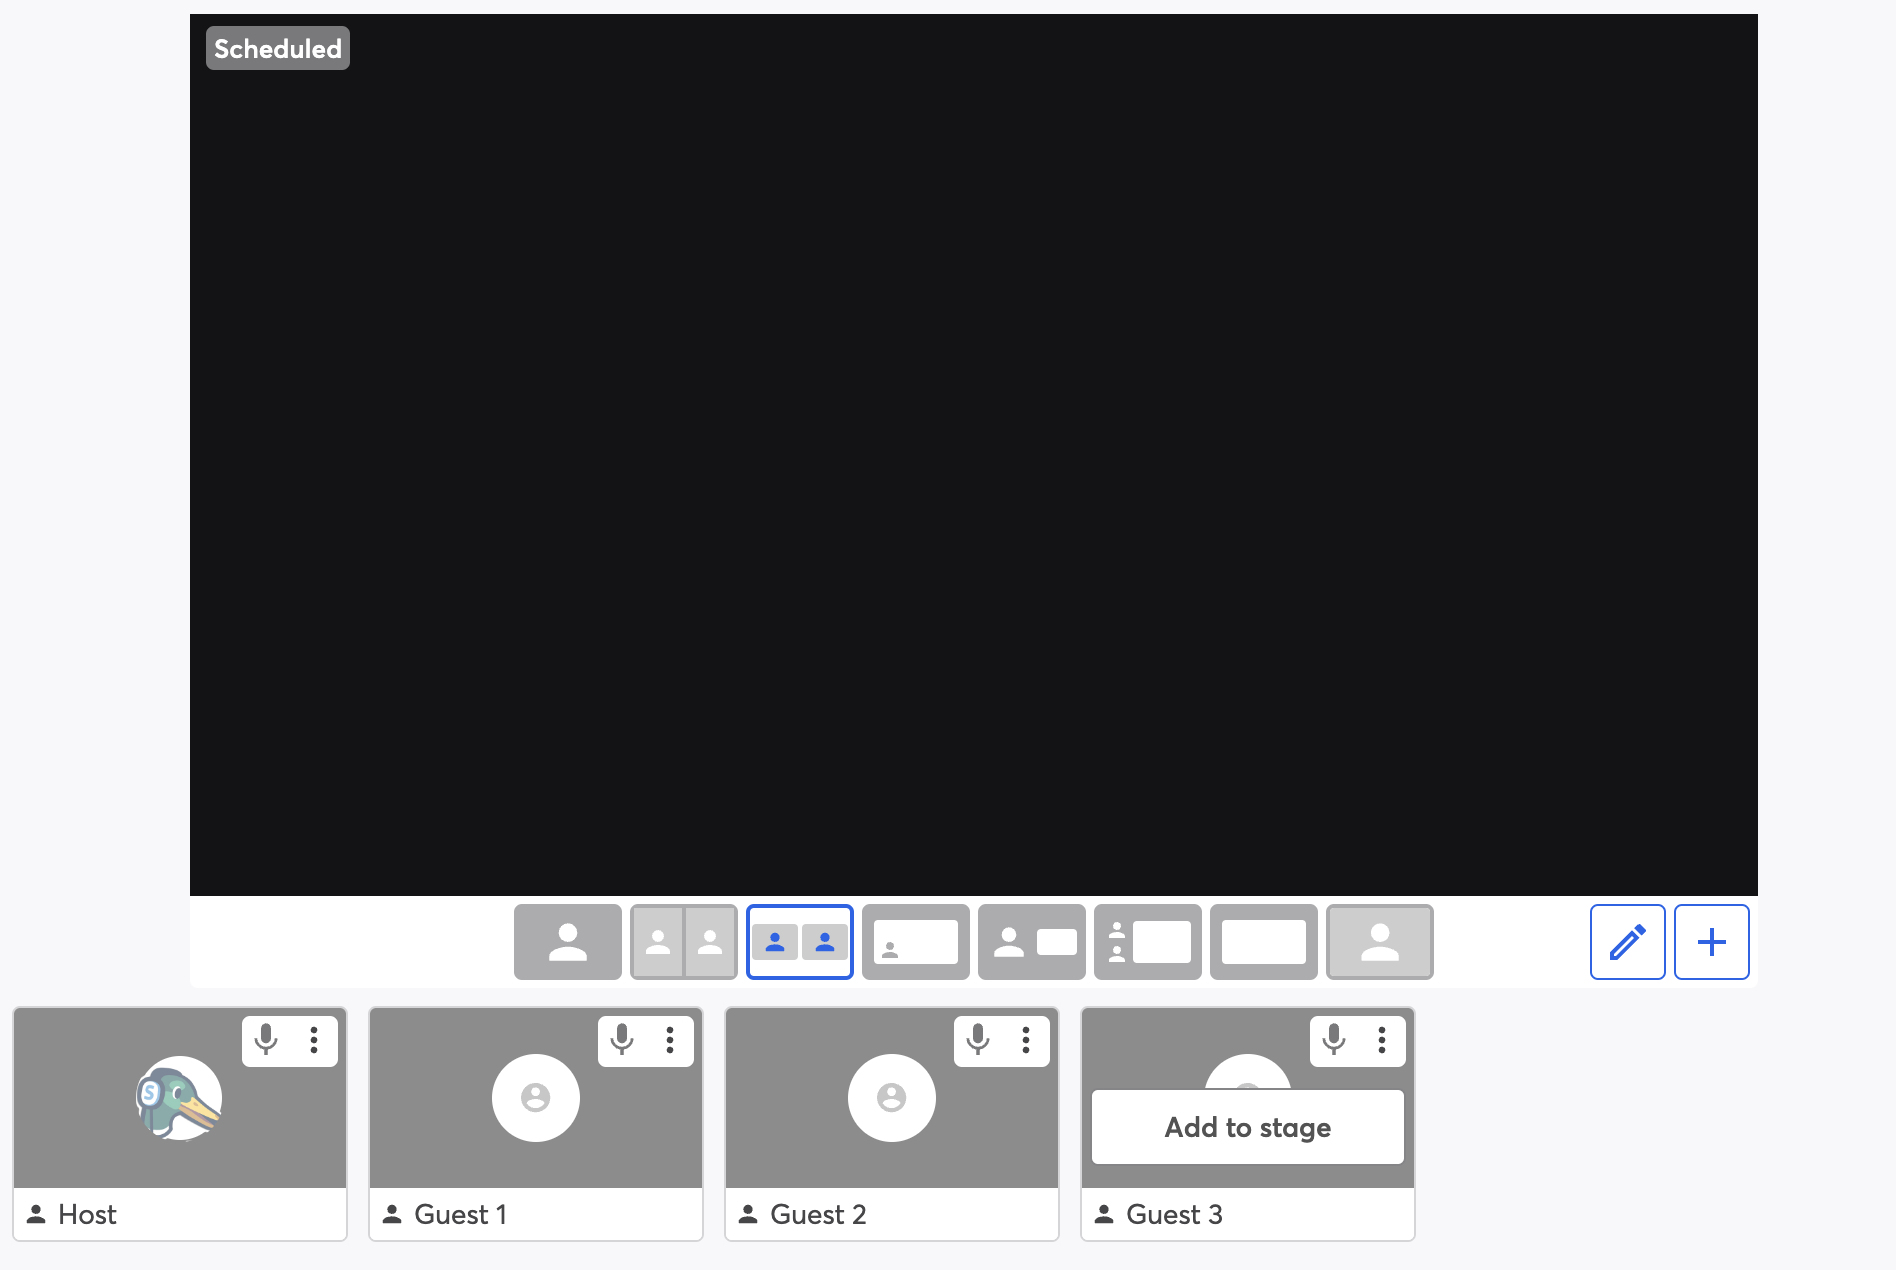
StreamYard On-Air supports up to 15 backstage participants. Our tool allows you to bring anyone on stage or take them off stage with just a click.
With your objectives clear, your topic chosen, and your team assembled, you're well on your way to a successful webinar.
Now, let's ensure your technical setup is just as polished.
Perfecting Your Technical Setup
It’s important to get your technical setup right to achieve a seamless webinar experience.
Here's how to create a high-standard webinar environment:
1. Choose the Right Equipment
The quality of your equipment can greatly influence the perception of your webinar.
High-quality audio and video gear not only improves the clarity of your presentation but also enhances the overall viewer experience. It makes your content more enjoyable and engaging.
Here’s what we recommend:
- Microphone: Audio clarity is essential. Opt for a USB microphone like the Blue Yeti or an Audio-Technica ATR2100x for clear, crisp sound. Avoid using your laptop's built-in microphone as it tends to pick up a lot of background noise.
- Camera: Visual quality can’t be compromised. A webcam like the Logitech C920 delivers sharp 1080p video, which is great for presenting a professional image. Ensure the camera is positioned at eye level for a natural look.
- Lighting: Good lighting makes a huge difference. Softbox lights or ring lights, like the Neewer Ring Light Kit, can illuminate your face evenly without harsh shadows. Place the light in front of you, slightly above eye level, to enhance your features on camera.
2. Set Up Your Webinar Space
Choose a location that’s quiet and free from interruptions.
Your backdrop should be neat and professional. Ensure there’s no clutter in the frame that could distract viewers. A simple, solid-color background or a tastefully decorated office space can work well.
Also, consider using a backdrop stand with a green screen for ultimate control over your visual environment, allowing you to add any background during the stream.
3. Familiarize Yourself with StreamYard On-Air
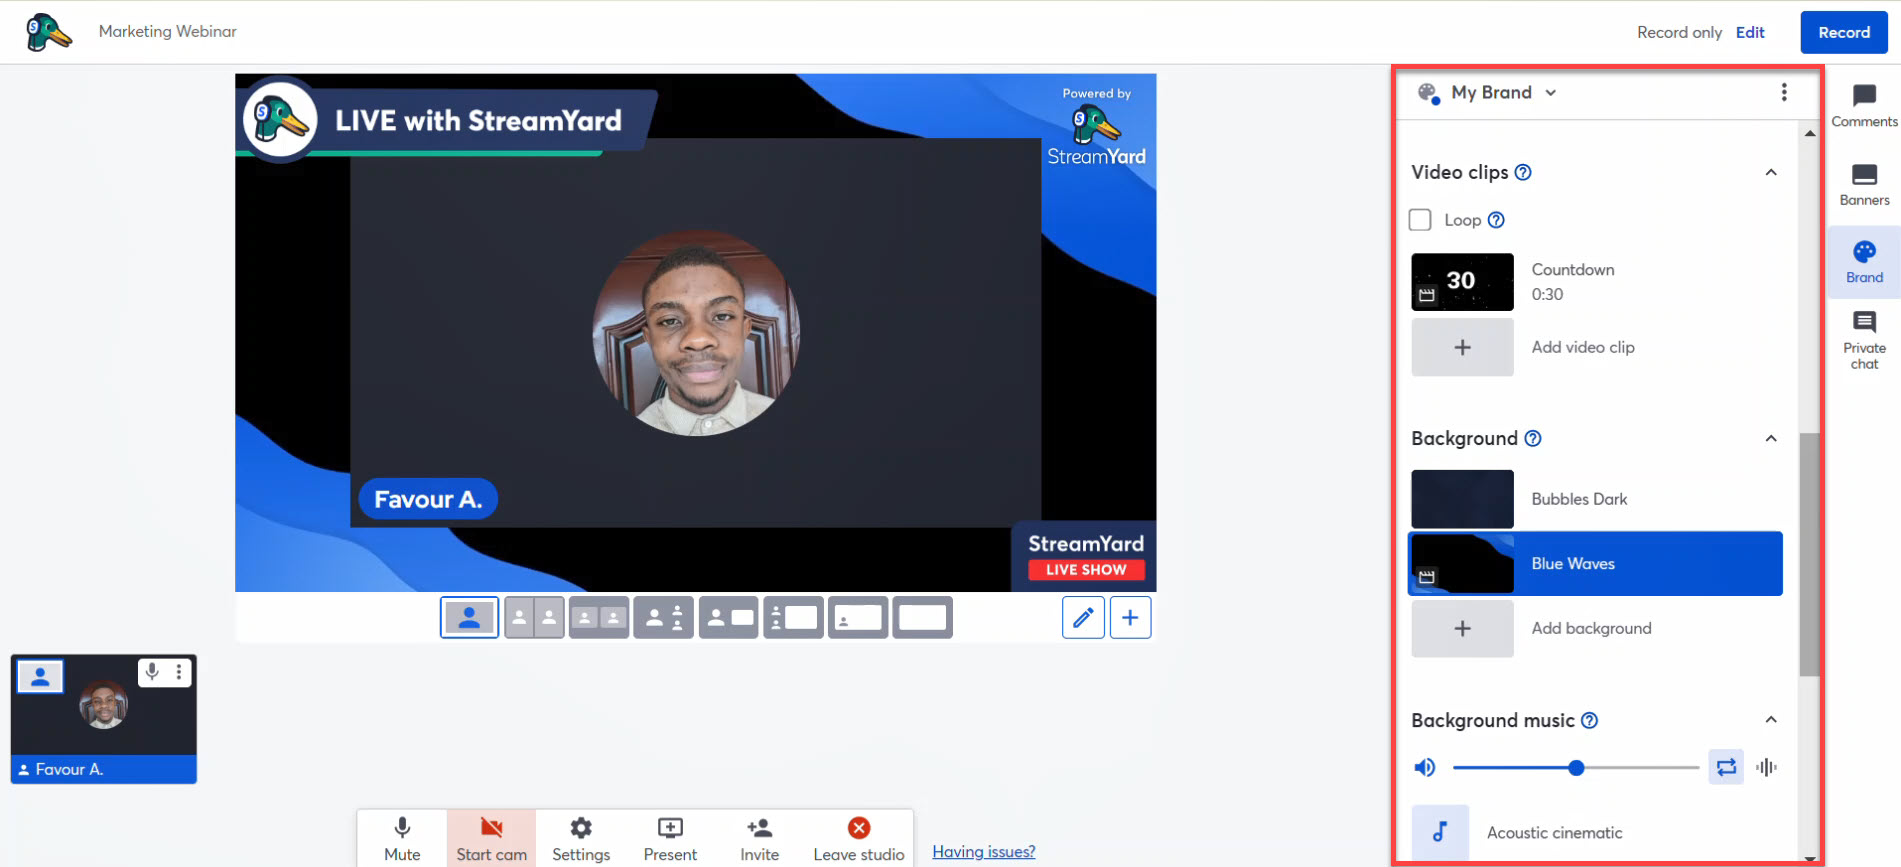
StreamYard On-Air offers features that can enhance viewer engagement, such as displaying viewer comments live, adding custom overlays, and integrating media smoothly into your presentation. Spend time exploring these features.
For example, learn how to use the screen sharing feature or add a countdown video clip to your webinar.
Familiarizing yourself with these features ahead of time will help you manage the live environment more effectively.
4. Schedule Your Webinar
Scheduling a webinar on StreamYard On-Air is straightforward. Here's how to do it:
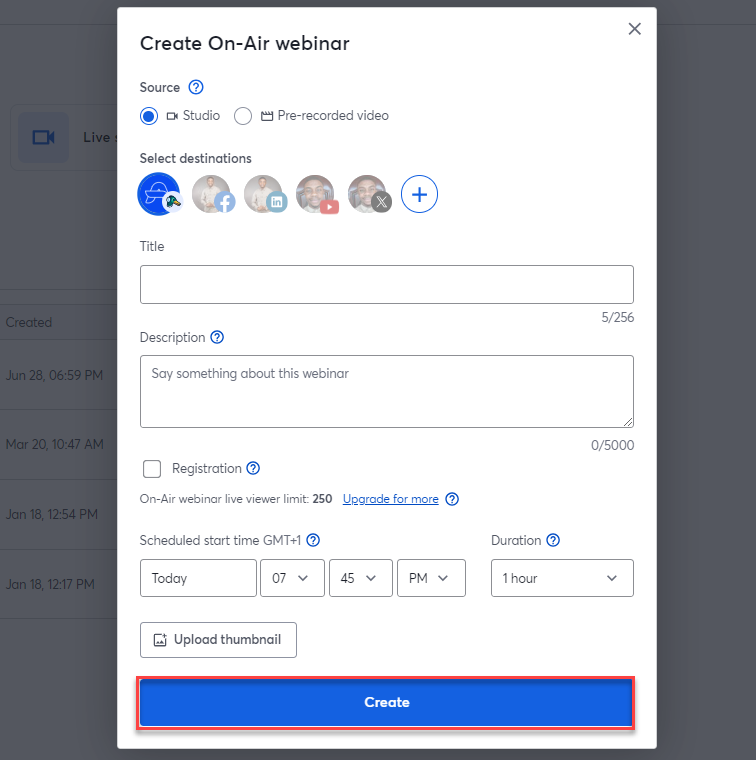
- Create a New Webinar: When logged in, click the 'On-Air webinar' button under the ‘Create’ section.
- Choose the Source: You can opt for a live session by selecting 'Studio' or choose 'Pre-recorded video' if you wish to use previously recorded content.
- Select the Destinations: Add any additional destinations if you plan to multistream to platforms like YouTube, Facebook, or LinkedIn.
- Set Details: Enter your webinar's title and description. Here, you can also upload a thumbnail image that will appear on the registration and holding page, providing a visual cue about your webinar's content.
- Registration Setup: Decide if you want to enable registration.
- Pick Date and Time: Schedule the exact date and time for your webinar. This helps in organizing and promoting the event beforehand.
After filling in the required details, click on “Create” to schedule your webinar.
Now, you can copy and share your unique webinar link with your audience.
5. Customize Your Webinar Registration Page
StreamYard On-Air allows you to customize your registration page with fields that collect attendees’ names, email addresses, and other information. You can also style the webinar registration form with your branding.

By allowing you to create a registration page without third-party tools, StreamYard On-Air streamlines the webinar creation process. It lets you keep all your webinar-related activities within one platform, making management smoother and more integrated.
6. Run a Test Webinar
Never underestimate the power of a dry run.
Conduct a full rehearsal of your webinar using StreamYard to test every aspect, from starting the live stream to transitioning between different segments like slideshows and guest interviews.
This practice session should involve all participants and cover potential scenarios like handling audience questions or technical difficulties.
It’s also a good time to test your internet connection and backup solutions to avoid any disruptions during the actual webinar.
Going Live and Captivating Your Audience with StreamYard On-Air
Ready to go live? We’ve got you covered.
Here’s a detailed step-by-step guide on how to create a successful and engaging live webinar using StreamYard On-Air.
Step 1: Finalize Preparations
Before going live, double-check your equipment.
Ensure your microphone, camera, and lighting are all set up and working correctly. Test your internet connection to avoid any disruptions. Have a glass of water nearby and keep your notes within reach but out of the camera’s view.
Being well-prepared can make a huge difference in the quality of your presentation.
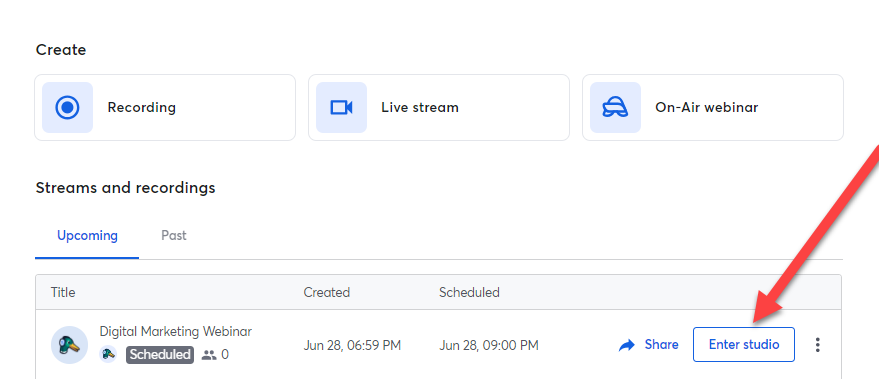
Step 2: Enter Your StreamYard Studio
Log in to your StreamYard account and navigate to your dashboard. Find your scheduled webinar under 'Upcoming' and click on ‘Enter studio’ to get started.
This is where you can manage your screen layout, overlays, and other last-minute adjustments before going live.
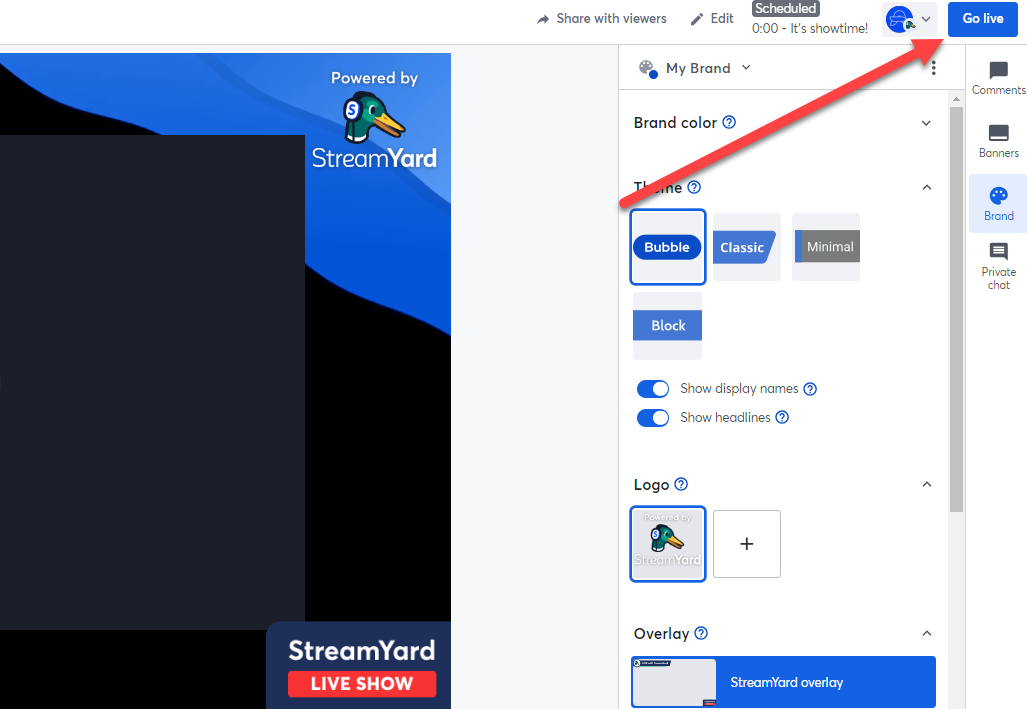
Step 3: Go Live
Once you’re in the Studio, confirm that all the settings are configured the way you desire. Double-check the layout, branding, camera settings, and other configurations.
Next, click on the “Go live” button in the upper right corner of the Studio to broadcast your webinar.
Step 4: Engage with Your Participants
Begin your live session with a warm welcome. Introduce yourself and outline what the webinar will cover.
Encourage participants to use the chat feature to introduce themselves and ask questions.
Remember, StreamYard On-Air allows you to display viewer comments on-screen. Take advantage of this feature and make the session interactive from the get-go.
Step 5: Deliver Your Content
Deliver your content confidently, following the outline you prepared.
StreamYard lets you integrate slides, videos, and other media seamlessly into your stream. Use these features to keep your presentation dynamic and engaging.
Transition smoothly between different segments to maintain your audience’s attention.
Step 6: Host an Interactive Q&A Session
Towards the end of your webinar, host a Q&A session. Announce this at the beginning to keep your audience engaged throughout.
Use the chat to gather questions and address them live. This interaction makes your audience feel valued and makes your webinar more impactful.
Step 7: Close Your Webinar
Conclude your webinar by summarizing the key points covered.
Thank your audience for their participation and inform them about how they can access the webinar recording. Mention any follow-up actions, like signing up for newsletters or attending future webinars.
Remember, a strong closing statement leaves a lasting impression and encourages future engagement.
When you’re ready to sign off, click on ‘End webinar’ on the upper right corner of the Studio to end the broadcast.
Why StreamYard On-Air is the Ideal Platform for Your Webinar
When choosing a platform for your webinar, StreamYard On-Air offers a comprehensive suite of features designed to make your webinars professional, engaging, and easy to manage.
There are several webinar platforms available. But, here’s why StreamYard On-Air should be your go-to choice.
User-Friendly Interface
StreamYard On-Air is built for ease of use. Its intuitive interface allows you to set up and run your webinar with minimal technical expertise.
There are no downloads required—everything is managed directly from your web browser.
This simplicity ensures you can focus on delivering great content rather than troubleshooting technical issues.
High-Quality Streaming
Quality is crucial, and StreamYard On-Air excels in delivering high-definition video and audio. Whether you are streaming live or using pre-recorded content, your audience will enjoy a clear and professional presentation.
Customizable Branding
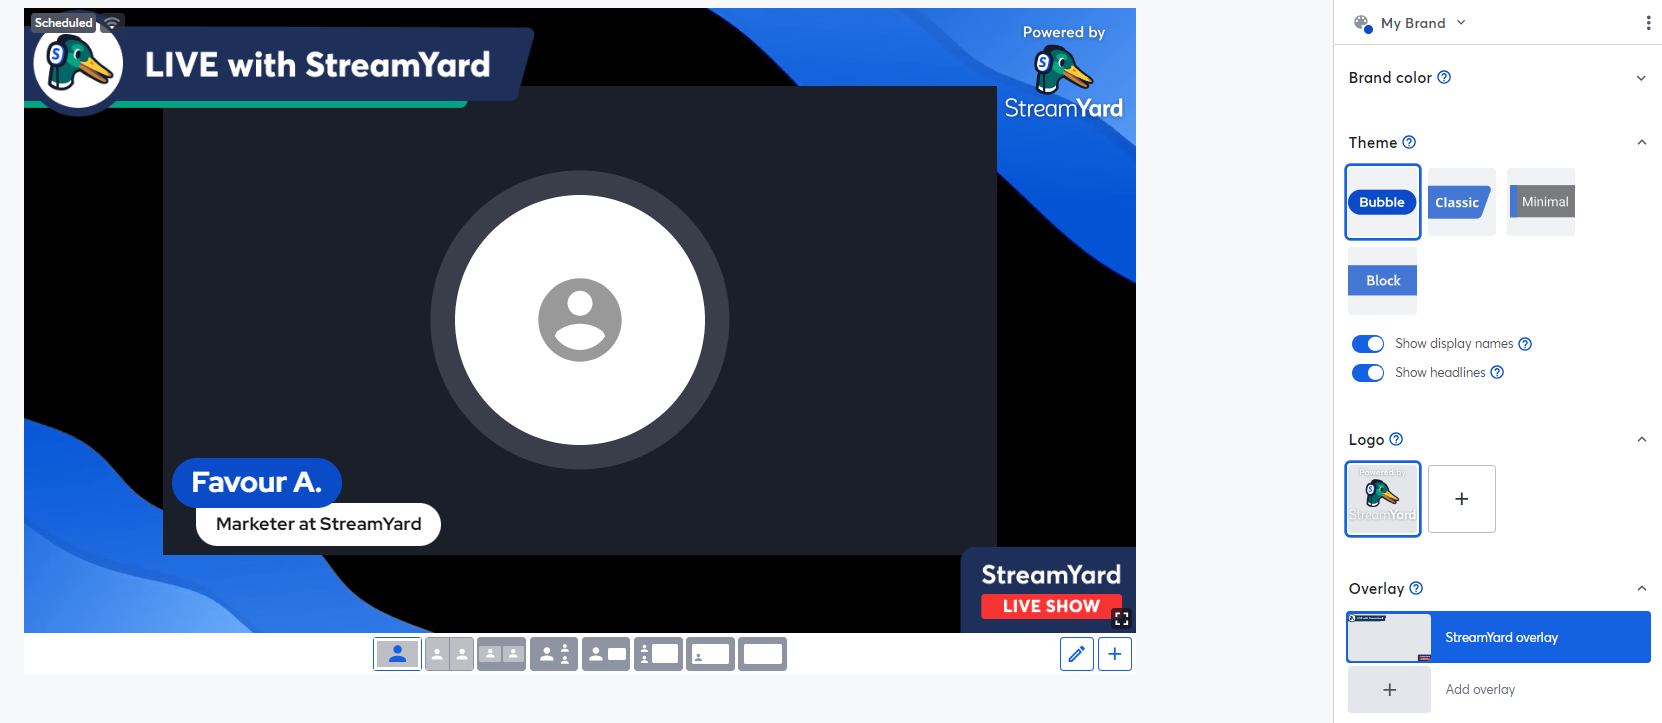
StreamYard On-Air allows you to fully customize your webinar to match your brand. You can add your logo, choose your brand colors, and create custom overlays and backgrounds.
This level of customization enhances your brand’s identity and gives your webinar a polished, professional look.
Interactive Features
Engagement is key to a successful webinar, and StreamYard On-Air offers robust interactive features.
Our tool allows you to display viewer comments on-screen in real-time, host Q&A sessions, and spice up the comment section with emoji reactions. These interactive elements keep your audience engaged and active participants in your presentation.
Multistreaming Capabilities
With StreamYard On-Air, you can broadcast your webinar to multiple platforms simultaneously, including Facebook, YouTube, LinkedIn, and more.
This multistreaming capability expands your reach and allows you to connect with a broader audience without additional effort.
Multiple Guests
StreamYard On-Air supports up to 10 guests. This allows you to host panel discussions or interviews with multiple guest speakers effortlessly.
Each guest can join from anywhere in the world using a simple browser link—no need for them to download any software or create an account.
Local Recording
One of StreamYard On-Air’s standout features is local recording.
Our software records a separate video and audio file for each participant directly on their device. This ensures high-quality, freeze-free recordings regardless of internet connection issues.
After the webinar, these recordings are automatically uploaded, providing you with top-quality content for post-production editing.
Content Repurposing
StreamYard On-Air makes it easy to repurpose your webinar content.
You can trim your videos into shorter clips suitable for platforms like YouTube Shorts, Instagram Reels, and TikTok.
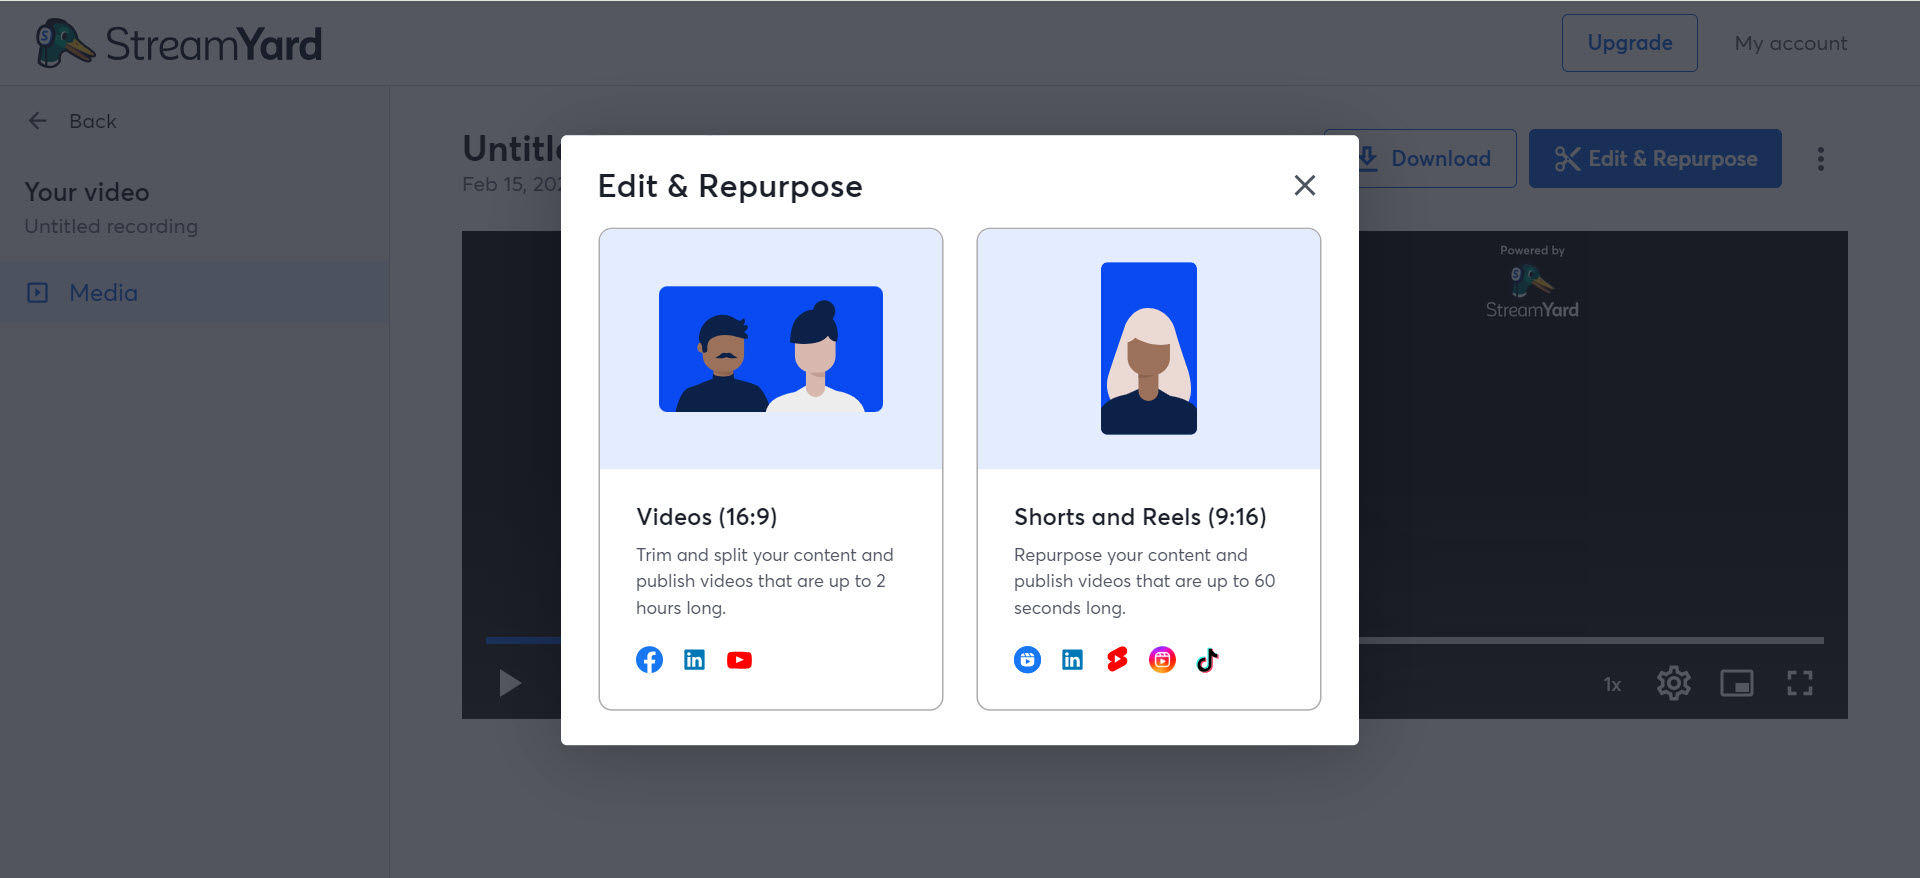
This feature allows you to maximize the value of your content by reaching different audiences across multiple platforms.
Reliability and Support
StreamYard On-Air is known for its reliability and stability. Our platform is designed to handle high traffic, ensuring a seamless streaming experience with minimal risk of technical issues.
Additionally, we offer excellent customer support to assist with any questions or problems that may arise.
Best Practices for Creating and Hosting Webinars
Creating a successful webinar involves more than just great content and a robust platform like StreamYard On-Air.
To truly captivate your audience and achieve your objectives, you need to follow best practices that enhance engagement, organization, and overall effectiveness.
Here are some best practices for creating and hosting webinars:
1. Know Your Audience
Understanding your audience is the first step to delivering a successful webinar. Conduct pre-webinar surveys to gather information about their interests, pain points, and expectations. Tailor your content to address these insights directly.
For example, if your audience is primarily educators, focus on practical strategies and tools they can implement in their classrooms.
2. Promote Early and Often
Promotion is key to attracting a large audience.
Start promoting your webinar at least three weeks in advance. Use multiple channels such as email newsletters, social media, and your website. Create engaging promotional content that highlights the value of attending your webinar.
Include compelling visuals and a clear call-to-action in your promotional materials, and remind your audience frequently as the date approaches to keep it on their radar.
3. Keep It Interactive
An interactive webinar keeps the audience engaged.
Use StreamYard On-Air’s features like Q&A sessions and displaying viewer comments on-screen. Encourage participation by asking questions and inviting responses.
Interactive elements make your audience feel involved and valued, which can improve their overall experience.
4. Stay Organized
Organization is crucial for a smooth webinar.
Create a detailed agenda and stick to it. Use a webinar outline to ensure you cover all necessary points and transition smoothly between segments.
Additionally, assign roles to your team members, such as a moderator to manage audience questions and a technical support person to handle any issues that arise.
5. Engage with Visuals
Visuals are a powerful way to keep your audience engaged.
Use high-quality slides, videos, and infographics to illustrate your points. StreamYard On-Air allows you to easily integrate these elements into your webinar.
Ensure your visuals are clear, relevant, and complement your spoken content rather than distract from it.
6. Practice, Practice, Practice
Rehearsing your webinar is essential to ensure everything runs smoothly.
Conduct a full run-through with your team, testing all equipment and features. This helps identify potential issues and allows you to refine your presentation.
Practicing also builds confidence, so you’re less likely to be thrown off by unexpected problems during the live online event.
7. Follow-Up Effectively
Following up after your webinar is crucial for maintaining engagement and building relationships.
Send thank-you emails to webinar attendees, including a link to the recording for those who missed it or want to rewatch it. Include a survey to gather feedback and understand what worked well and what could be improved.
Use this feedback to refine future webinars and continue providing value to your audience.
Conclusion
Creating a successful webinar involves careful planning, engaging content, and a reliable platform.
By following the steps outlined in this guide, you can ensure your webinar is well-prepared, technically sound, and highly interactive.
StreamYard On-Air provides all the tools you need to deliver a professional and engaging webinar, from high-quality streaming and customizable branding to interactive features and detailed analytics.
Ready to host your next webinar session? Use StreamYard On-Air. Both you and your viewers deserve nothing but the best!
FAQs
How do I create my own webinar?
Creating your own webinar involves selecting a platform like StreamYard On-Air, defining your objectives, choosing a relevant topic, creating a detailed outline, scheduling the webinar, and promoting it effectively.
Can I host a webinar for free?
Yes, you can host a webinar for free using platforms like Zoom, which offers a basic plan with limited features. However, StreamYard On-Air is a more affordable alternative that provides a broader range of features, such as high-quality streaming, customizable branding, and robust interactive tools.
How do I create content for a webinar?
Creating content for a webinar involves understanding your audience's needs, crafting a compelling narrative, using engaging visuals, and including interactive elements like polls and Q&A sessions. Plan your content around key points and rehearse to ensure a smooth delivery.
How much does it cost to set up a webinar?
The cost of setting up a webinar can vary widely depending on the platform and features you choose. StreamYard offers various pricing plans, starting with a free tier and scaling up based on the number of attendees and advanced features required.
What equipment do I need to create a professional webinar?
To create a professional webinar, you'll need a high-quality microphone, a good webcam, proper lighting, and a stable internet connection. Additionally, having a quiet, well-organized space and a reliable platform like StreamYard On-Air will enhance the overall quality of your webinar.
What are some tips for a live webinar?
Tips for a live webinar include thorough preparation, engaging your audience through interactive features, keeping your content concise and focused, rehearsing beforehand, and ensuring your technical setup is robust.
What are the best practices for promoting a webinar?
Promote your webinar by starting early, using multiple channels such as email, social media, and your website. Create engaging promotional content, send reminder emails as the date approaches, and leverage your network to spread the word.